> ## Documentation Index
> Fetch the complete documentation index at: https://docs.zapier.com/llms.txt
> Use this file to discover all available pages before exploring further.
# Add input fields to triggers and actions
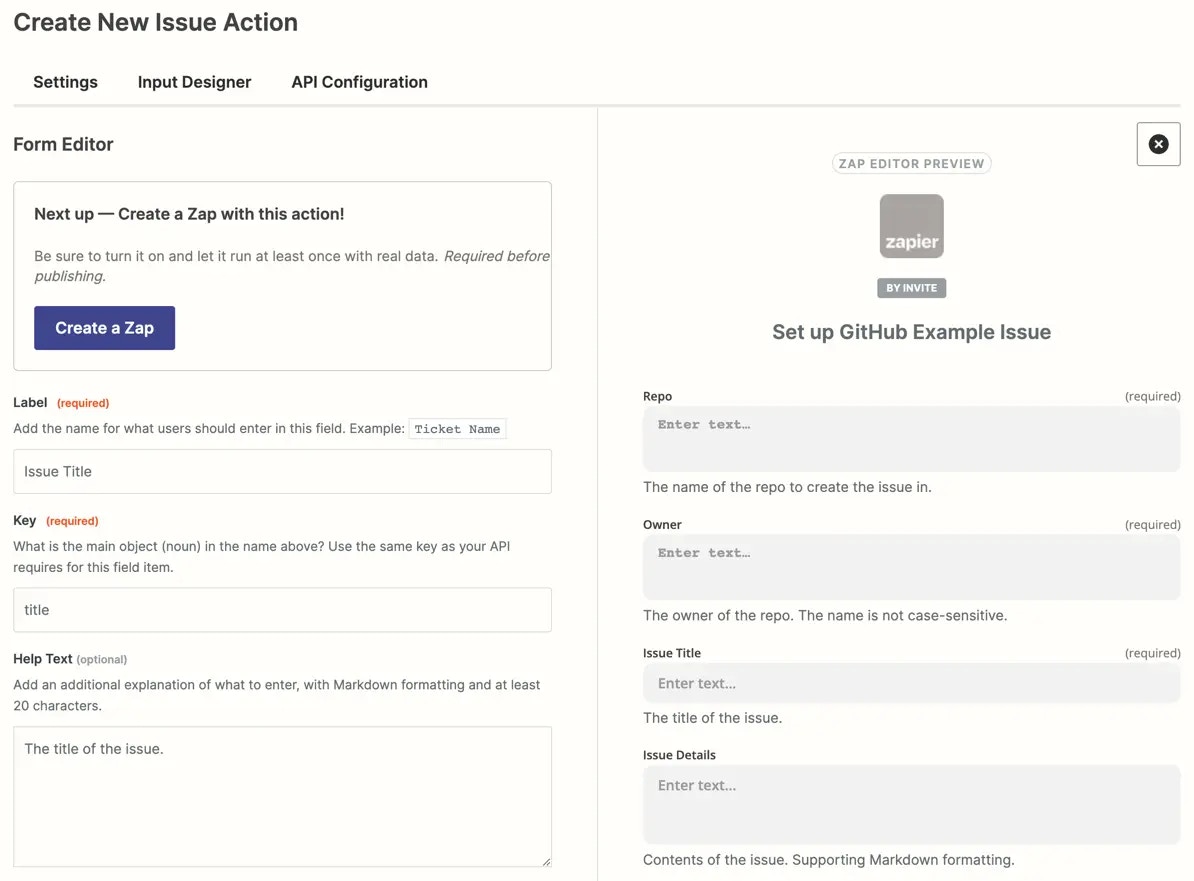
> When building in the Platform UI, you'll use the Input Designer to create the form users will input data into, to send to your app's API.
The Input Designer works similarly to other form builder tools, building a form that lives inside the Platform UI. Add fields to your form for each bit of data your app needs from users. Use the same name for items as used in your app's UI. Configure each field's settings, then reorder them to match the logical order users would add or view data in your app.
{" "}
 {" "}
Actions require an input form, as they always need a way for users to send data to your app's API to find, update, or create a new object. An input form is optional for triggers.
In this guide we will cover:
* Add an input field to a trigger or action
* Set field options
* Reorder input fields
* Remove input fields
## Add an input field to a trigger or action
1. Log into the [Platform UI](https://zapier.com/app/developer).
2. Select your **integration**.
3. In the *Build* section in the left sidebar, click on your **trigger** or **action**.
4. Click the **Input Designer** tab.
5. For triggers, click **Add User Input Field**. For actions, click **Add** and select **Input Field**.
6. In the Form editor, add in details about your input field:
* **Key**: A unique identifier for the field, without spaces, ideally with the same key as your API, such as `first_name`.
* **Label**: A user friendly name for the field, such as `First Name`.
* **Help Text**: (optional) A 20 character or longer description that appears under the field label, with [Markdown](https://zapier.com/blog/beginner-ultimate-guide-markdown/) formatting. Do not include redundant help text in input fields that repeats the name of the field. Use field help text to tell users what to do, for example “Choose the directory to watch for new files”. Always use active voice.
* **Type**: From the dropdown menu, select type of data you want user's to enter. Learn more in [field definitions and types](/integrations/build/field-definitions):
* String
* Text
* Integer
* Number
* Boolean
* DateTime
* Password
* Dictionary
* **Default Text**: (optional) Value to include in the field if the user leaves it blank; only include if this value would work for API requests made to every user's account.
* **Options** (optional):
* Select the **Required** checkbox to make it mandatory for users to add data into this input field.
* Select **Allows Multiples** checkbox if you want users to add multiple enteries into the same input field.
* Select **Alters Dynamic Fields** to have Zapier automatically recompute any dynamic fields any time this field is changed.
* Select **Dropdown** 7. Once you've finished adding details for your input field, click **Save**.
## Setting field options
### Required
An email app like MailChimp requires an email address to add a new email subscription, and a calendar app like Google Calendar requires an event title, date, and time to add new events.
Check the *Required* option on those fields if your trigger or action step requires any data to make the API request. Zapier will show a red `(required)` label beside the field name in the Zap editor, and will not let users complete the Zap step without adding data to that field.
{" "}
{" "}
Actions require an input form, as they always need a way for users to send data to your app's API to find, update, or create a new object. An input form is optional for triggers.
In this guide we will cover:
* Add an input field to a trigger or action
* Set field options
* Reorder input fields
* Remove input fields
## Add an input field to a trigger or action
1. Log into the [Platform UI](https://zapier.com/app/developer).
2. Select your **integration**.
3. In the *Build* section in the left sidebar, click on your **trigger** or **action**.
4. Click the **Input Designer** tab.
5. For triggers, click **Add User Input Field**. For actions, click **Add** and select **Input Field**.
6. In the Form editor, add in details about your input field:
* **Key**: A unique identifier for the field, without spaces, ideally with the same key as your API, such as `first_name`.
* **Label**: A user friendly name for the field, such as `First Name`.
* **Help Text**: (optional) A 20 character or longer description that appears under the field label, with [Markdown](https://zapier.com/blog/beginner-ultimate-guide-markdown/) formatting. Do not include redundant help text in input fields that repeats the name of the field. Use field help text to tell users what to do, for example “Choose the directory to watch for new files”. Always use active voice.
* **Type**: From the dropdown menu, select type of data you want user's to enter. Learn more in [field definitions and types](/integrations/build/field-definitions):
* String
* Text
* Integer
* Number
* Boolean
* DateTime
* Password
* Dictionary
* **Default Text**: (optional) Value to include in the field if the user leaves it blank; only include if this value would work for API requests made to every user's account.
* **Options** (optional):
* Select the **Required** checkbox to make it mandatory for users to add data into this input field.
* Select **Allows Multiples** checkbox if you want users to add multiple enteries into the same input field.
* Select **Alters Dynamic Fields** to have Zapier automatically recompute any dynamic fields any time this field is changed.
* Select **Dropdown** 7. Once you've finished adding details for your input field, click **Save**.
## Setting field options
### Required
An email app like MailChimp requires an email address to add a new email subscription, and a calendar app like Google Calendar requires an event title, date, and time to add new events.
Check the *Required* option on those fields if your trigger or action step requires any data to make the API request. Zapier will show a red `(required)` label beside the field name in the Zap editor, and will not let users complete the Zap step without adding data to that field.
{" "}
 {" "}
Include a description on required fields to let users know exactly what type of data they should add to this field. Never mark fields as required if the integration could work without them.
### Allows multiples
If users could add multiple entries in the same field, check the *Allows Multiples* option.
{" "}
{" "}
Include a description on required fields to let users know exactly what type of data they should add to this field. Never mark fields as required if the integration could work without them.
### Allows multiples
If users could add multiple entries in the same field, check the *Allows Multiples* option.
{" "}
 {" "}
That will add another entry row to allow the user to input another entry for that field. An [array containing a comma separated list of entries](/images/95938b473edfee13663161ee3c8e5ea4.webp) is sent in the API request. Never ask users to type in a comma separated list, rather use this functionality.
### Alters dynamic fields
For each [dynamic field](/integrations/build/dynamic-field) in your integration, Zapier runs code to decide whether to show a field or what to show in a field.
Check the *Alters Dynamic Fields* option, to have Zapier automatically recompute any dynamic fields in your Zapier integration anytime this field is changed. Do not check the *Alters Dynamic Fields* option unless the field is needed for your integrations' dynamic fields.
{" "}
{" "}
That will add another entry row to allow the user to input another entry for that field. An [array containing a comma separated list of entries](/images/95938b473edfee13663161ee3c8e5ea4.webp) is sent in the API request. Never ask users to type in a comma separated list, rather use this functionality.
### Alters dynamic fields
For each [dynamic field](/integrations/build/dynamic-field) in your integration, Zapier runs code to decide whether to show a field or what to show in a field.
Check the *Alters Dynamic Fields* option, to have Zapier automatically recompute any dynamic fields in your Zapier integration anytime this field is changed. Do not check the *Alters Dynamic Fields* option unless the field is needed for your integrations' dynamic fields.
{" "}
 {" "}
Only dropdowns support *Alters Dynamic Fields*.
### Dropdown
#### Static Dropdown
To offer users pre-set options to choose from in a field, set your field type as `String`, then check the *Dropdown* option.
{" "}
{" "}
Only dropdowns support *Alters Dynamic Fields*.
### Dropdown
#### Static Dropdown
To offer users pre-set options to choose from in a field, set your field type as `String`, then check the *Dropdown* option.
{" "}
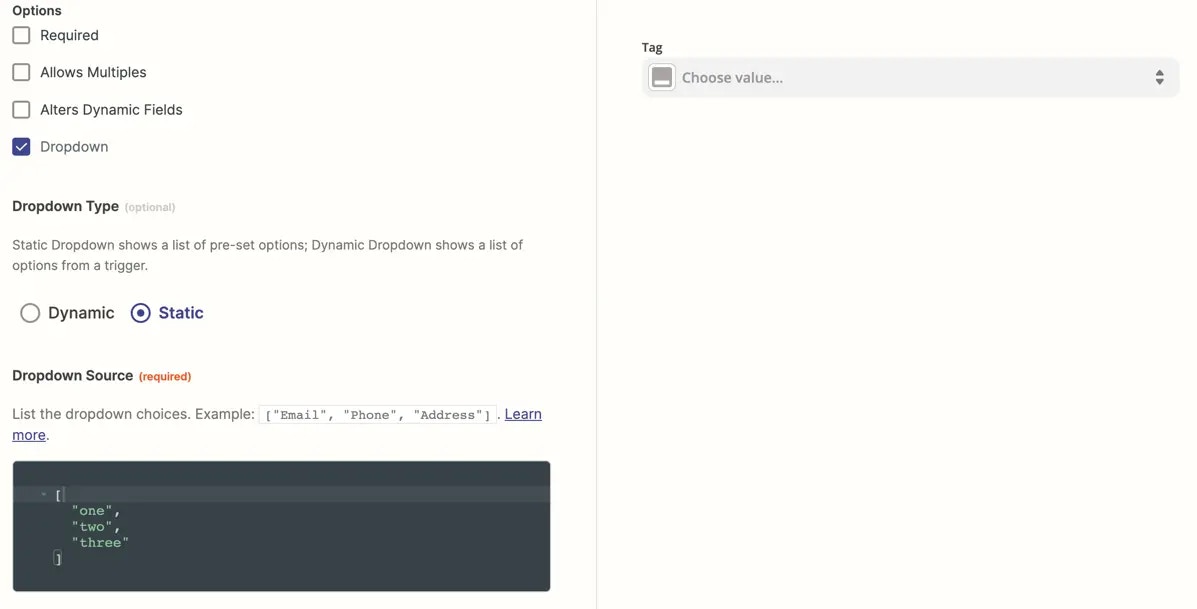 {" "}
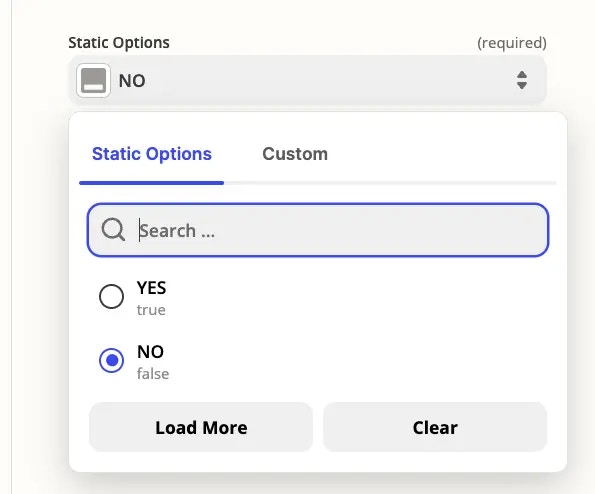
You'll see the default *Static* selected, or *Dynamic*. To add a Static menu of choices, type the options in a comma separated list, with quotes around each item and square brackets around the set, such as:
`["one", "two","three"]`
Enter the fields as used in your API, as Zapier will pass the exact value users select to your app. Zapier will capitalize each item in your dropdown menu in the Zap Editor, and will add spaces instead of any underscores, so an option like `first_name` would show in the menu as `First Name` to users.
**Static Dropdown with Key Value Pairs**
If your API requires different values for the field than the text you want to show to users inside the dropdown menu in Zapier, make a key value pair that includes the value to send to your API, the sample value to show users ([should be the same as the value](https://github.com/zapier/zapier-platform/blob/master/packages/schema/docs/build/schema.md#fieldchoicewithlabelschema)), and a user-friendly label.
{" "}
{" "}
You'll see the default *Static* selected, or *Dynamic*. To add a Static menu of choices, type the options in a comma separated list, with quotes around each item and square brackets around the set, such as:
`["one", "two","three"]`
Enter the fields as used in your API, as Zapier will pass the exact value users select to your app. Zapier will capitalize each item in your dropdown menu in the Zap Editor, and will add spaces instead of any underscores, so an option like `first_name` would show in the menu as `First Name` to users.
**Static Dropdown with Key Value Pairs**
If your API requires different values for the field than the text you want to show to users inside the dropdown menu in Zapier, make a key value pair that includes the value to send to your API, the sample value to show users ([should be the same as the value](https://github.com/zapier/zapier-platform/blob/master/packages/schema/docs/build/schema.md#fieldchoicewithlabelschema)), and a user-friendly label.
{" "}
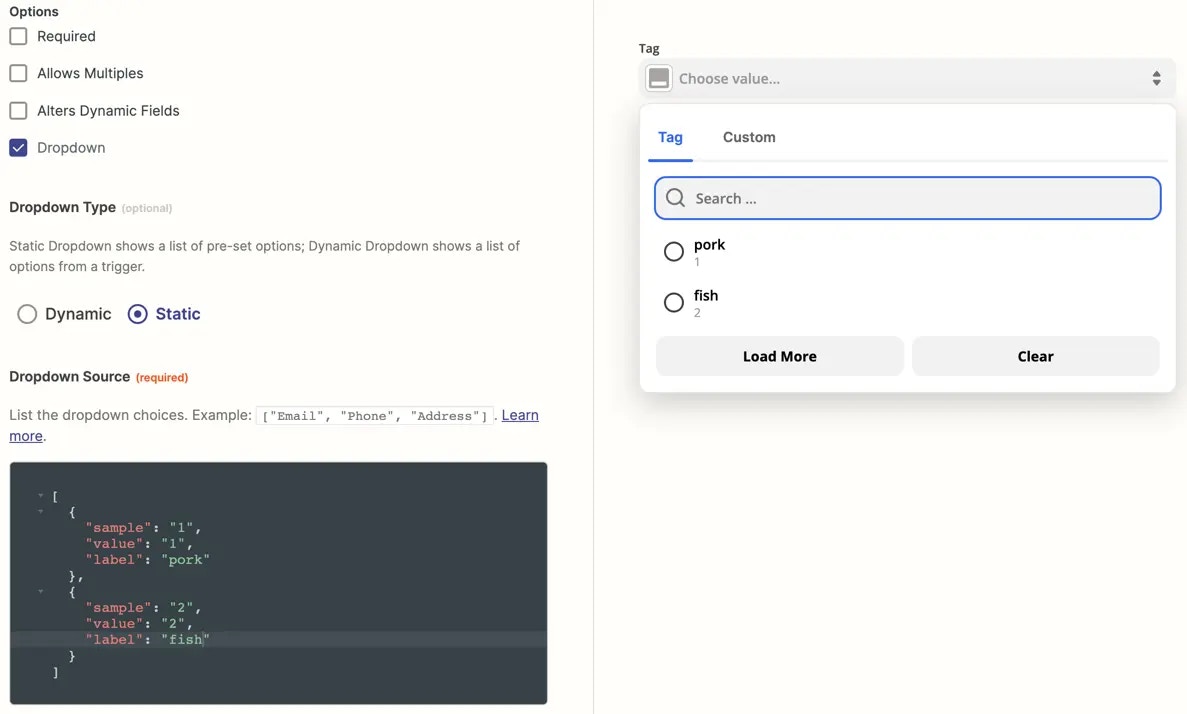 {" "}
To do that, add each menu item inside an object (curly brackets); with the sample, value, and label comma separated. List the item first and the value second, both wrapped in quotes. Separate each menu item with commas, and wrap the whole set in an array (square brackets).
For example, if your API expects a value of `1` or `2`, but `1` actually means `pork` and `2` actually means `fish` to a user, you could use the following code to add the dropdown menu pictured:
```JSON theme={null}
[
{
"sample": "1",
"value": "1",
"label": "Pork"
},
{
"sample": "2",
"value": "2",
"label": "Fish"
}
]
```
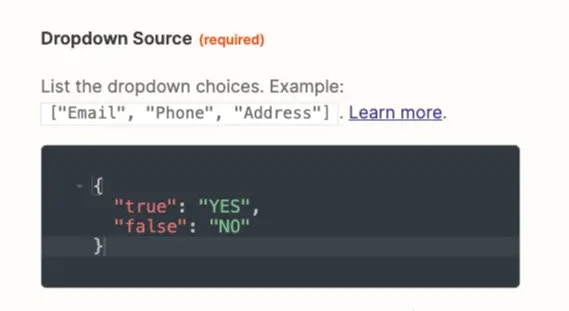
Alternatively, you can also use the syntax of `value:label`, which shows to users as follows:
{" "}
{" "}
To do that, add each menu item inside an object (curly brackets); with the sample, value, and label comma separated. List the item first and the value second, both wrapped in quotes. Separate each menu item with commas, and wrap the whole set in an array (square brackets).
For example, if your API expects a value of `1` or `2`, but `1` actually means `pork` and `2` actually means `fish` to a user, you could use the following code to add the dropdown menu pictured:
```JSON theme={null}
[
{
"sample": "1",
"value": "1",
"label": "Pork"
},
{
"sample": "2",
"value": "2",
"label": "Fish"
}
]
```
Alternatively, you can also use the syntax of `value:label`, which shows to users as follows:
{" "}
 {" "}
{" "}
{" "}
{" "}
 {" "}
#### Dynamic Dropdown
If users need to select data from their account in your app — such as a project, folder, team member, or other user-specific detail with a corresponding ID — then you would use a dynamic dropdown. For dynamic dropdowns, Zapier first fetches data from your API and then displays it in a menu. Never make users type in an ID number, rather use this functionality or [add a search action](/integrations/build/search) to find the ID number automatically.
The best way to make a dynamic dropdown is to use a dedicated trigger to fetch the values for the menu.
**1. Build a trigger to fetch dynamic dropdown data**
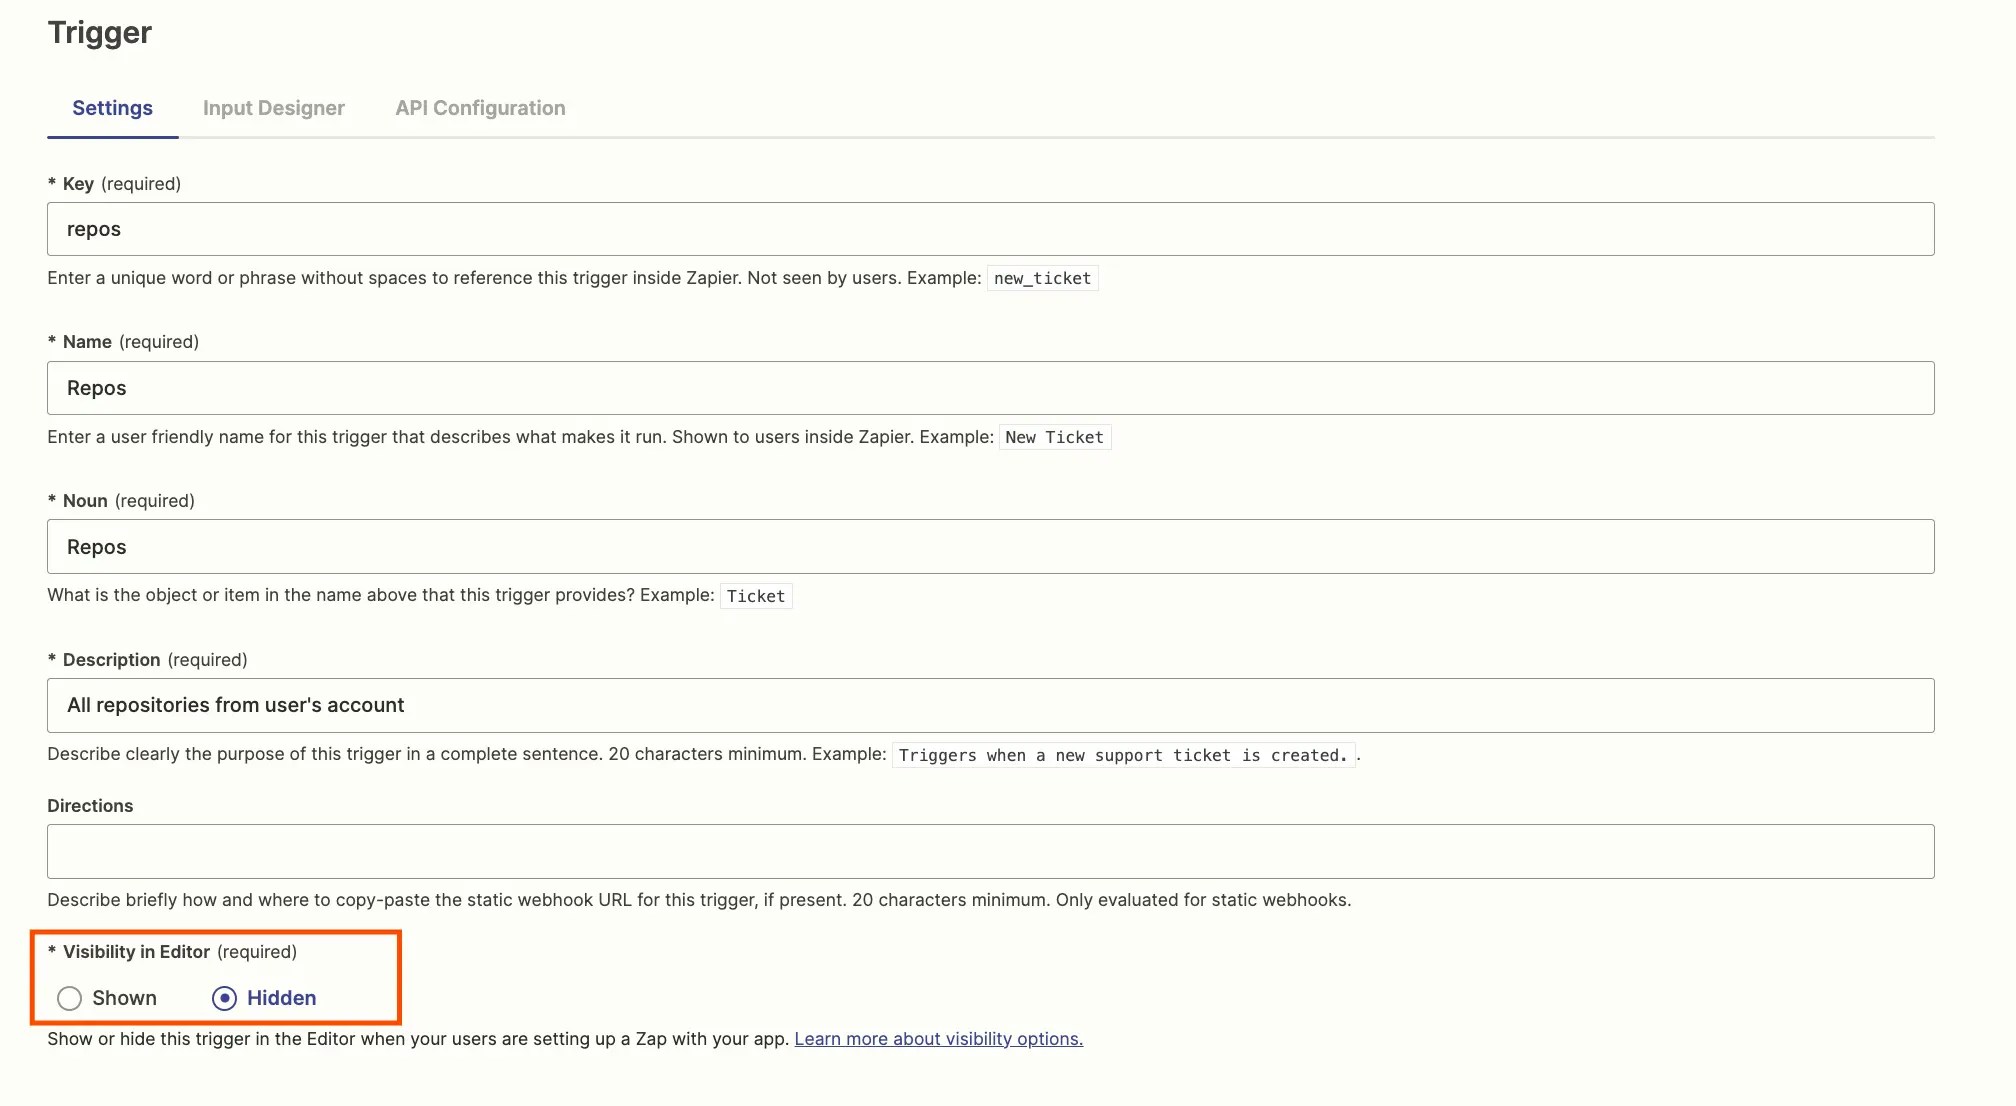
Create a new trigger, with a key, name, and noun. This trigger is usually configured to not be seen by users but you may wish to include a description for your internal team's awareness. In the *Visibility in Editor* field, select `Hidden` to hide this trigger from your app's trigger list in Zapier.
{" "}
{" "}
#### Dynamic Dropdown
If users need to select data from their account in your app — such as a project, folder, team member, or other user-specific detail with a corresponding ID — then you would use a dynamic dropdown. For dynamic dropdowns, Zapier first fetches data from your API and then displays it in a menu. Never make users type in an ID number, rather use this functionality or [add a search action](/integrations/build/search) to find the ID number automatically.
The best way to make a dynamic dropdown is to use a dedicated trigger to fetch the values for the menu.
**1. Build a trigger to fetch dynamic dropdown data**
Create a new trigger, with a key, name, and noun. This trigger is usually configured to not be seen by users but you may wish to include a description for your internal team's awareness. In the *Visibility in Editor* field, select `Hidden` to hide this trigger from your app's trigger list in Zapier.
{" "}
 {" "}
You can also use an existing, visible trigger to power a dynamic dropdown if applicable.
Skip the *Input Designer* tab, as the dynamic dropdown cannot require any user input.
Select the *API Configuration* tab, and add the API call where Zapier can fetch the data from your API. For standard Zapier triggers, you would use an API call that fetches new or updated items. For dynamic dropdowns, instead use an API call that pulls in a list of the items that the user can select from.
{" "}
{" "}
You can also use an existing, visible trigger to power a dynamic dropdown if applicable.
Skip the *Input Designer* tab, as the dynamic dropdown cannot require any user input.
Select the *API Configuration* tab, and add the API call where Zapier can fetch the data from your API. For standard Zapier triggers, you would use an API call that fetches new or updated items. For dynamic dropdowns, instead use an API call that pulls in a list of the items that the user can select from.
{" "}
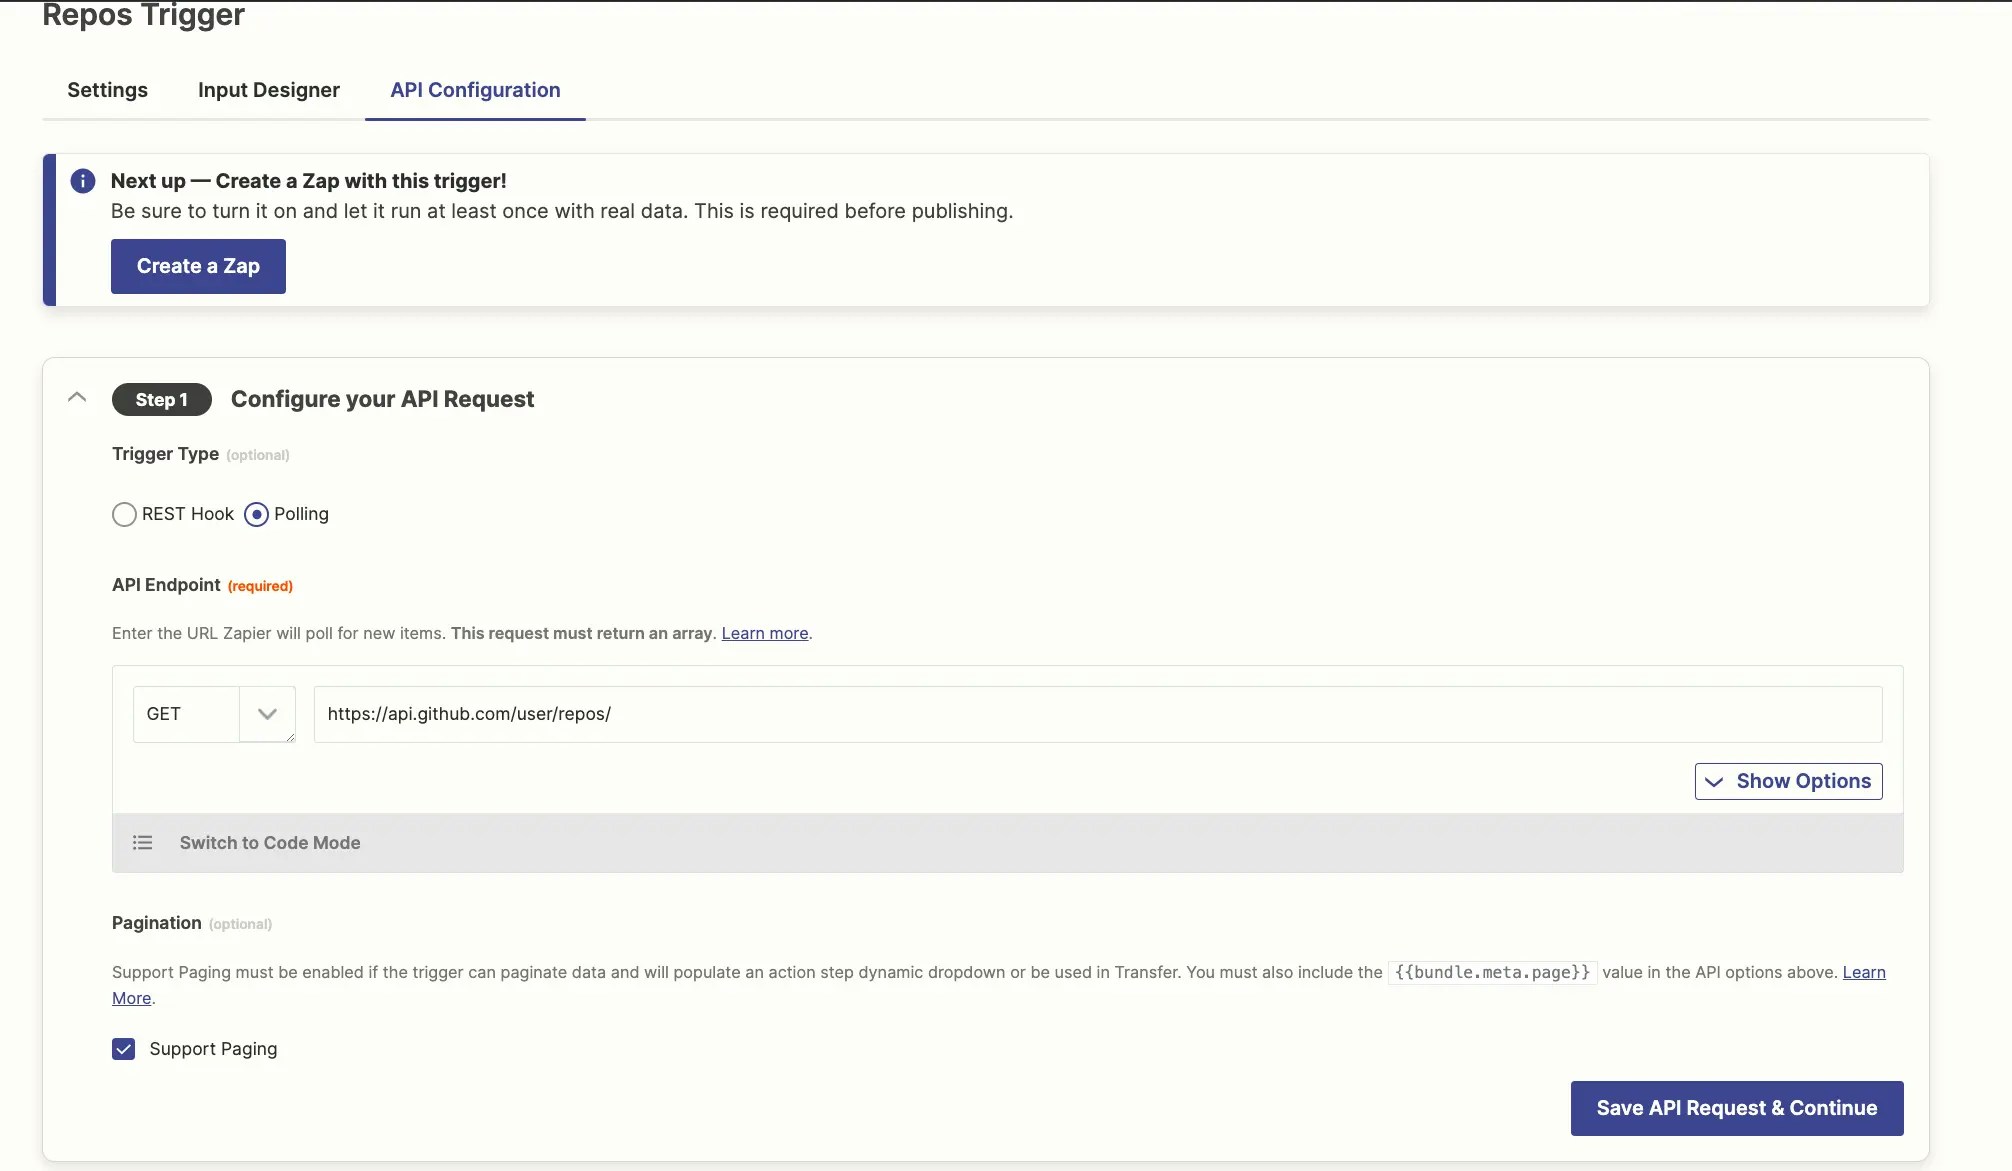 {" "}
API calls will usually require additional configuration to pull in data in the order that makes most sense in your menu. You may want to sort options in the order they were added or updated, or want to have the API fetch more items at once than the default. Set these parameters from the *Show Options* menu.
{" "}
{" "}
API calls will usually require additional configuration to pull in data in the order that makes most sense in your menu. You may want to sort options in the order they were added or updated, or want to have the API fetch more items at once than the default. Set these parameters from the *Show Options* menu.
{" "}
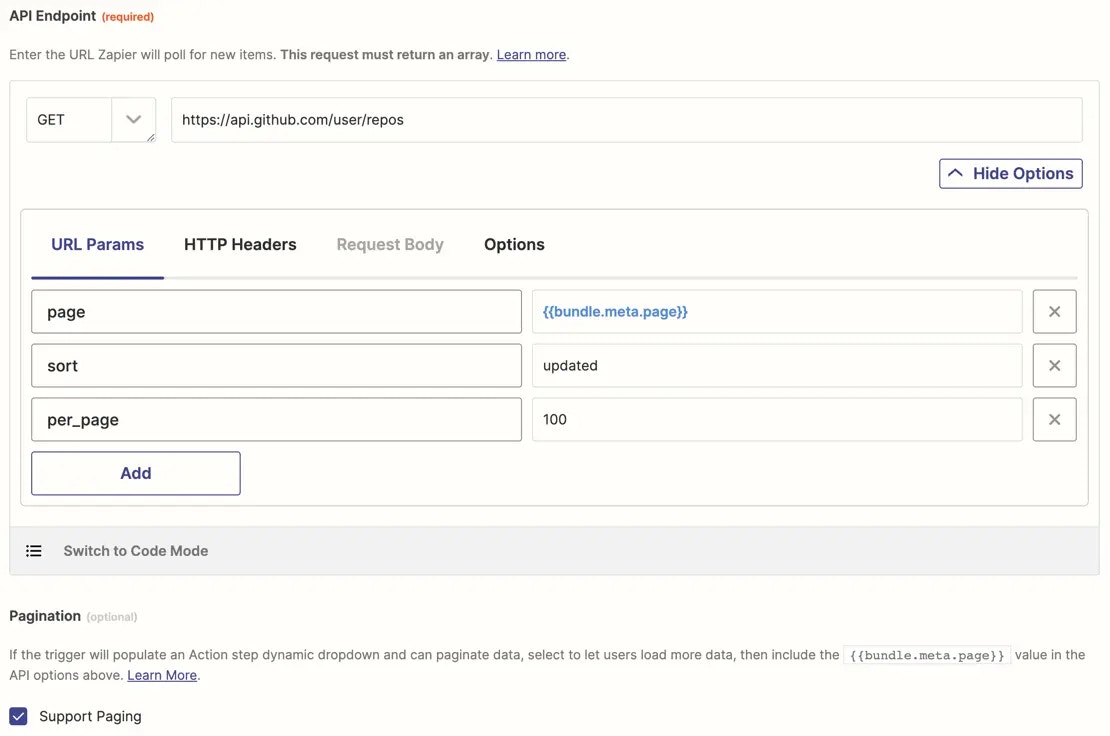 {" "}
If your API supports pagination, you can allow users to load additional data in
the menu by checking the *Support Paging* box. The first API call might pull in
20 items; if the user requests additional items, Zapier would call the API again
and request the second page for the next 20 items. *per\_page* and *limit* are
common parameters to indicate how many items to pull (controlling the page
size). Confirm which parameter to use from your API's documentation.
Customize the pagination using [Code Mode](/integrations/build/code-mode). Learn more about [how to use pagination in triggers](/integrations/build/trigger#how-to-use-pagination).
Zapier shows the data in the dropdown menu in the order your API sends it to Zapier. If your API sends the data in alphabetical order, or numerical order, it will show as such in your drop-down menu. If your API call supports sorting, include the sorting parameter in your API call that would return data in the order you want it to show in your drop-down.
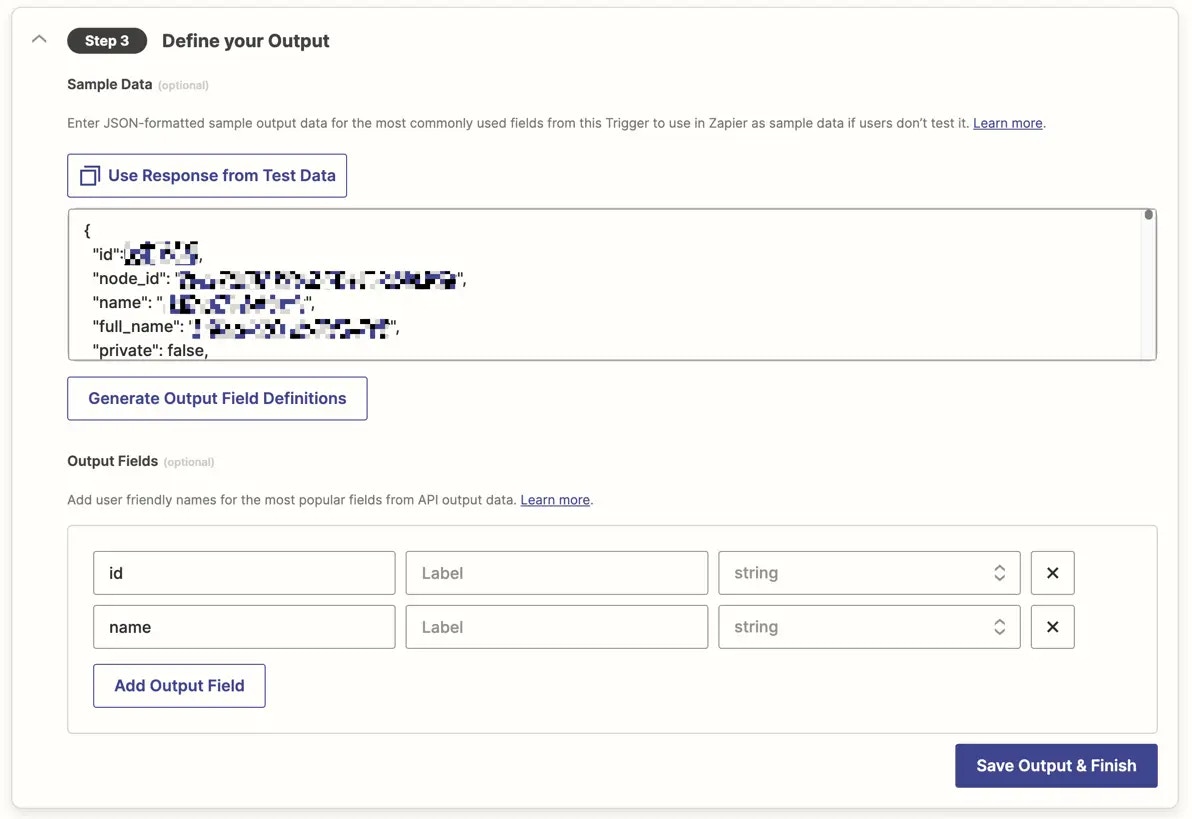
Define the fields from this hidden trigger that you need to use in the dynamic dropdown input field. To do so, test your trigger and identify the output fields needed, adding them to the *Output Fields* list at the end of your settings page. Include at least a field with the data that Zapier needs to send to your API in the action (for example `id`), along with a field that includes a user-friendly `name` for the data in that field.
{" "}
{" "}
If your API supports pagination, you can allow users to load additional data in
the menu by checking the *Support Paging* box. The first API call might pull in
20 items; if the user requests additional items, Zapier would call the API again
and request the second page for the next 20 items. *per\_page* and *limit* are
common parameters to indicate how many items to pull (controlling the page
size). Confirm which parameter to use from your API's documentation.
Customize the pagination using [Code Mode](/integrations/build/code-mode). Learn more about [how to use pagination in triggers](/integrations/build/trigger#how-to-use-pagination).
Zapier shows the data in the dropdown menu in the order your API sends it to Zapier. If your API sends the data in alphabetical order, or numerical order, it will show as such in your drop-down menu. If your API call supports sorting, include the sorting parameter in your API call that would return data in the order you want it to show in your drop-down.
Define the fields from this hidden trigger that you need to use in the dynamic dropdown input field. To do so, test your trigger and identify the output fields needed, adding them to the *Output Fields* list at the end of your settings page. Include at least a field with the data that Zapier needs to send to your API in the action (for example `id`), along with a field that includes a user-friendly `name` for the data in that field.
{" "}
 {" "}
**2. Add an input field with dynamic fields**
To use the data from the hidden trigger you've configured, add a new input field to the trigger/action you're working on, and set the label, key, and other details as normal. Check the *Dropdown* box and select the *Dynamic* toggle. Choose the hidden trigger you've configured for this menu in the *Dropdown Source* option.
{" "}
{" "}
**2. Add an input field with dynamic fields**
To use the data from the hidden trigger you've configured, add a new input field to the trigger/action you're working on, and set the label, key, and other details as normal. Check the *Dropdown* box and select the *Dynamic* toggle. Choose the hidden trigger you've configured for this menu in the *Dropdown Source* option.
{" "}
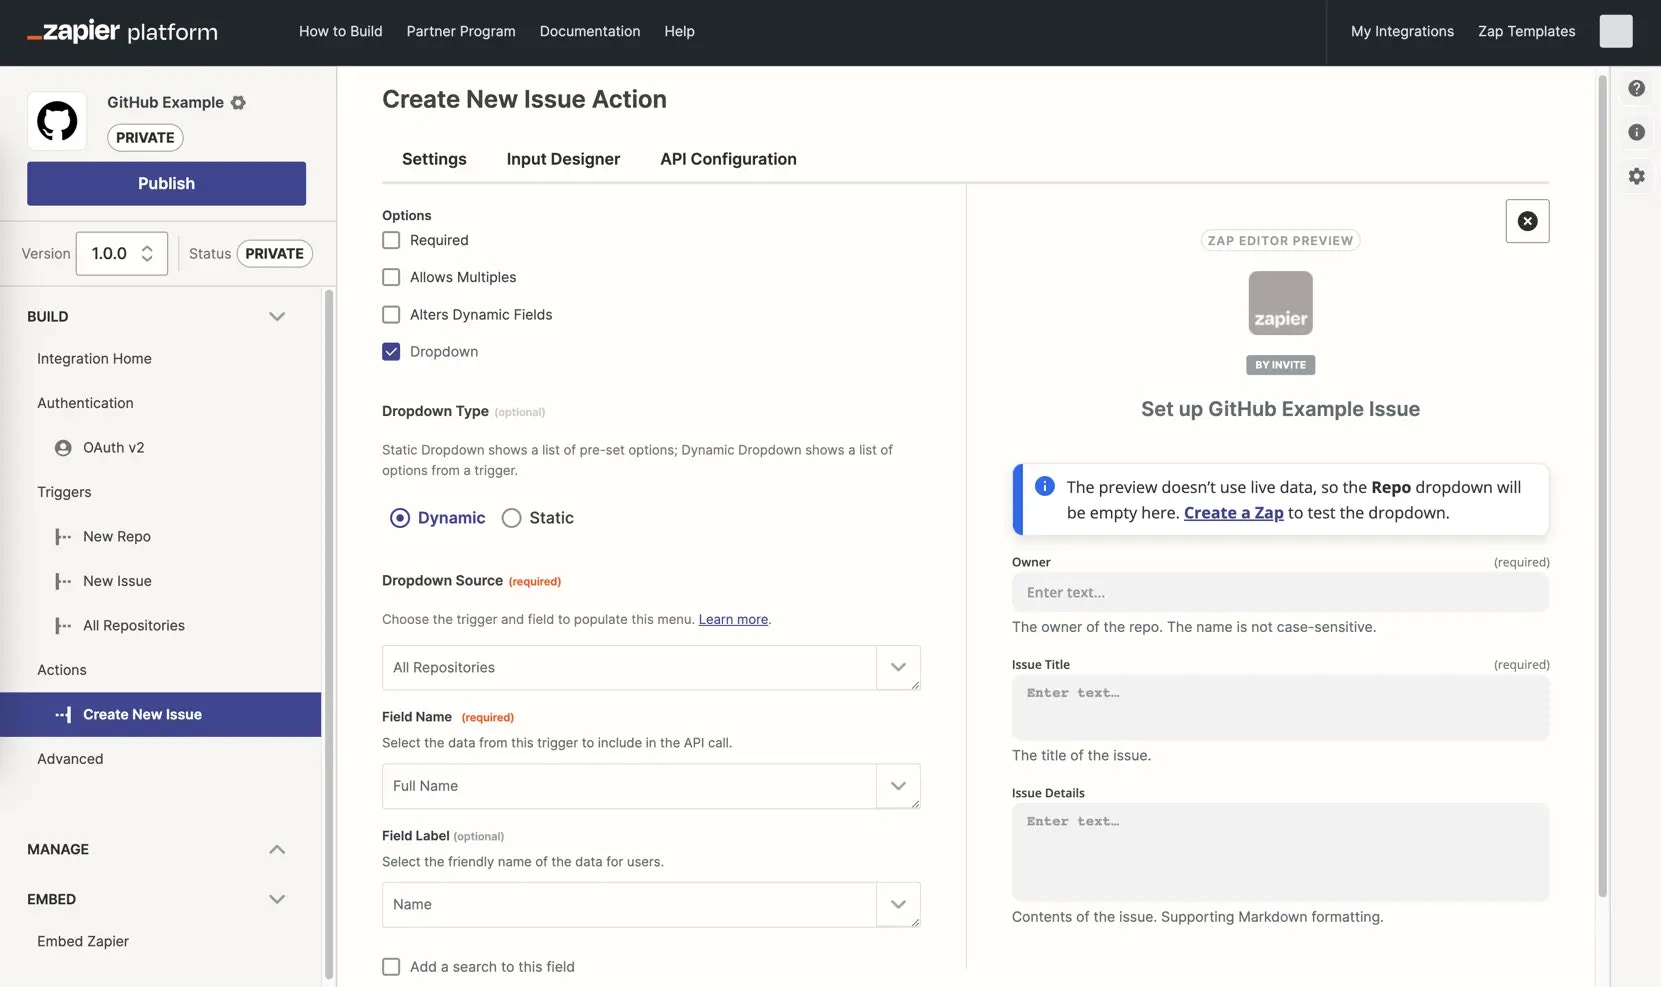 {" "}
Select the field with the data your API needs for this action in the *Field Name* menu, and the field with a human-friendly name for the data in the *Field Label* menu. The [preview will indicate the presence of the field](/images/4780bb34f2f3d24062d2eb556ed1e3a9.webp), but you will need to use your trigger/action in a Zap to test the menu and pull in real data.
When this trigger/action is selected in a Zap, the user will see a dropdown as Zapier polls your API for the data from that hidden trigger, parse the entries and extract the fields you specified, showing them in a user-friendly dropdown menu. The human-friendly name will be in larger, darker text, and the value to be sent to the API in smaller, lighter text.
{" "}
{" "}
Select the field with the data your API needs for this action in the *Field Name* menu, and the field with a human-friendly name for the data in the *Field Label* menu. The [preview will indicate the presence of the field](/images/4780bb34f2f3d24062d2eb556ed1e3a9.webp), but you will need to use your trigger/action in a Zap to test the menu and pull in real data.
When this trigger/action is selected in a Zap, the user will see a dropdown as Zapier polls your API for the data from that hidden trigger, parse the entries and extract the fields you specified, showing them in a user-friendly dropdown menu. The human-friendly name will be in larger, darker text, and the value to be sent to the API in smaller, lighter text.
{" "}
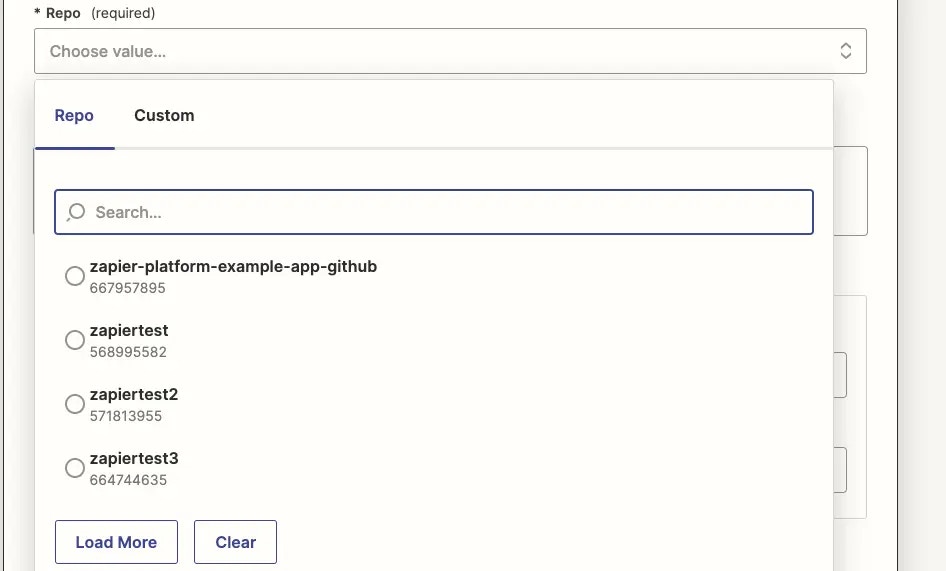 {" "}
It is important to provide the API value (example `id`) for users to know what type of data the field expects. Users can also choose to [enter a custom value](/images/f72a12759a3b3b391025f6500f6c7904.webp)
and map data from other Zap steps into this field. Being able to see what type of value to map is extremely helpful.
**3. Add search to a dynamic field (optional)**
Dynamic Dropdown menus can optionally include an additional *Add a Search Step* button beside the dropdown menu. This lets users dynamically select the correct item from a dynamic field based on input from previous Zap steps.
{" "}
{" "}
It is important to provide the API value (example `id`) for users to know what type of data the field expects. Users can also choose to [enter a custom value](/images/f72a12759a3b3b391025f6500f6c7904.webp)
and map data from other Zap steps into this field. Being able to see what type of value to map is extremely helpful.
**3. Add search to a dynamic field (optional)**
Dynamic Dropdown menus can optionally include an additional *Add a Search Step* button beside the dropdown menu. This lets users dynamically select the correct item from a dynamic field based on input from previous Zap steps.
{" "}
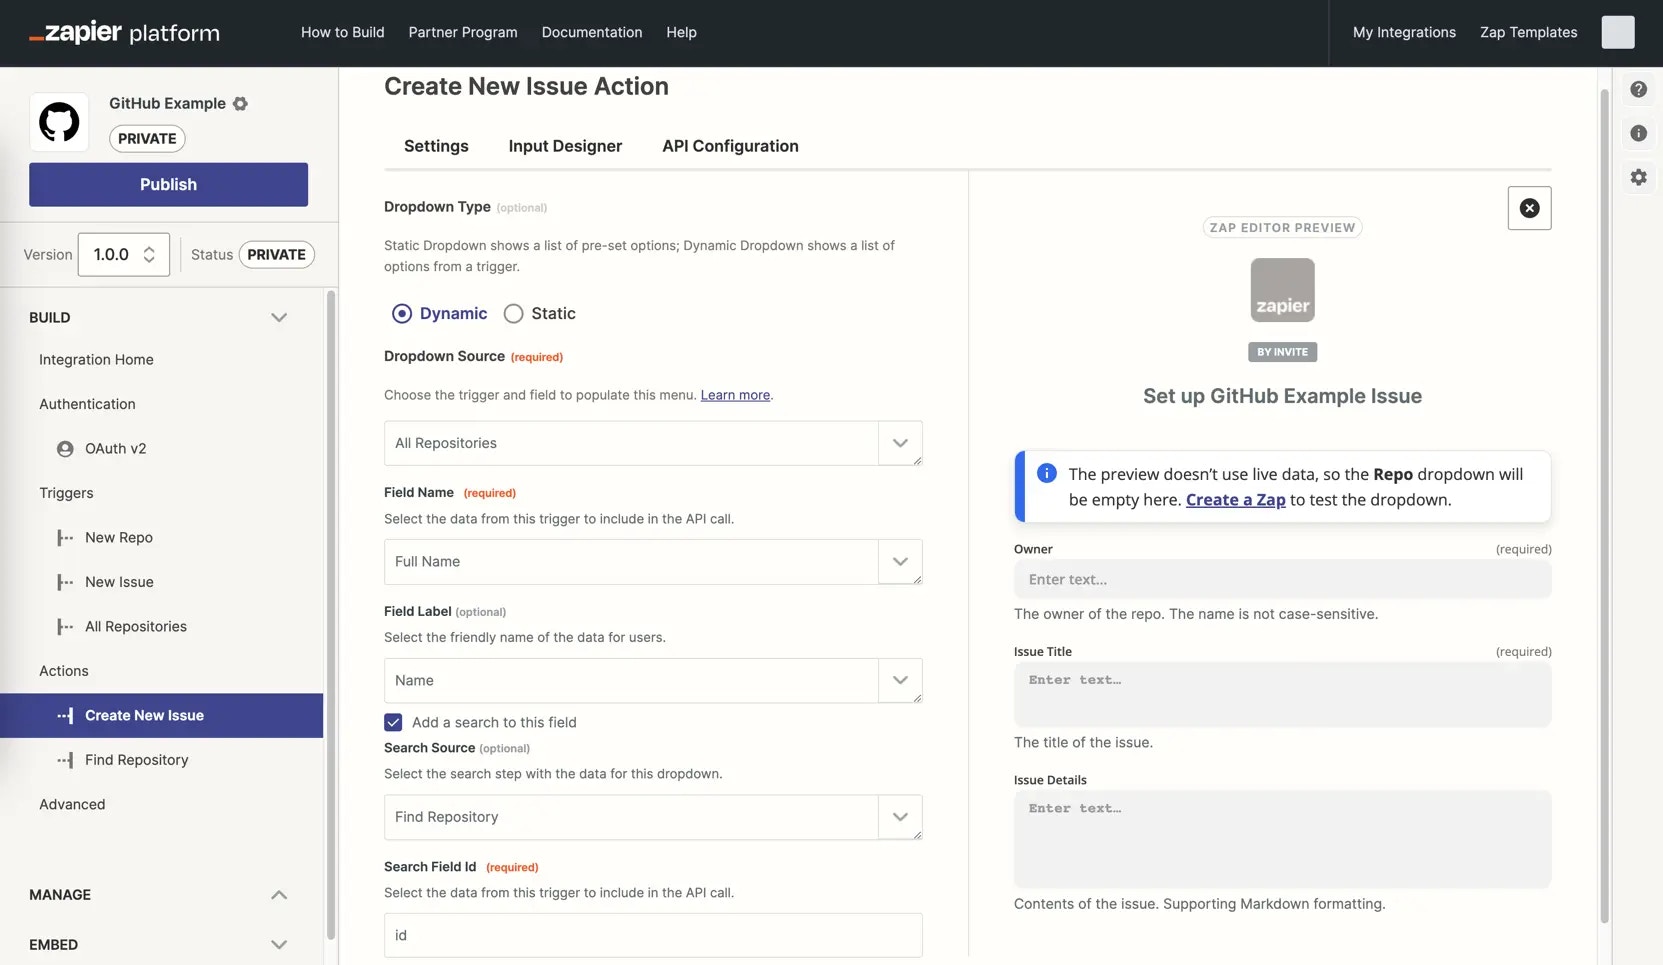 {" "}
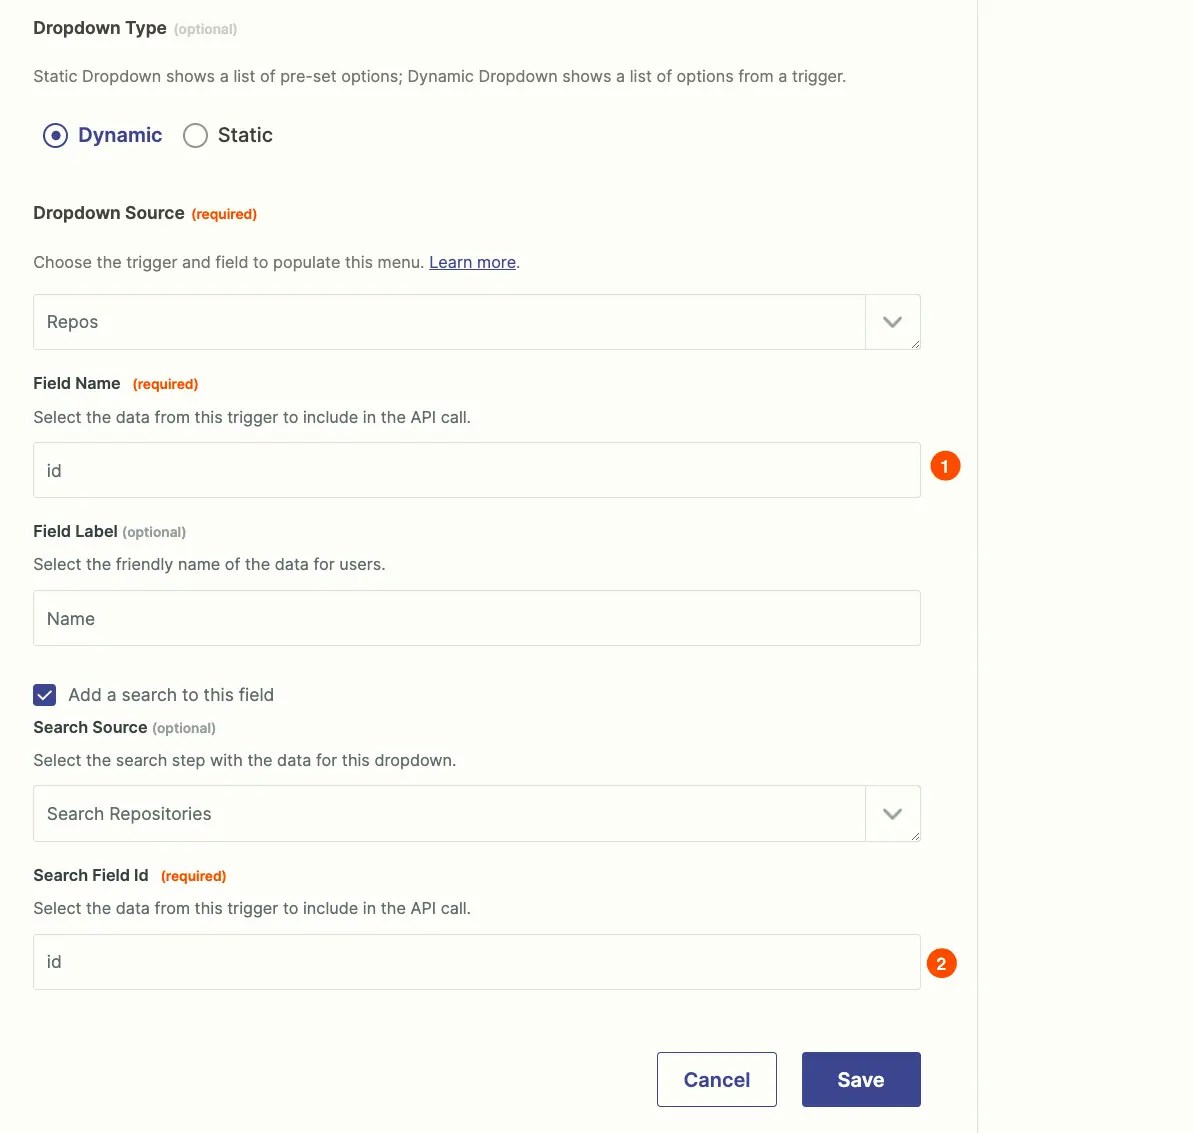
You'll need to add a [Search Action](/integrations/build/action#how-to-add-a-search-action) to find the items used in this dropdown menu. Then check the *Add a search to this field* option under the dynamic dropdown you've built, choose that action, and enter the ID of the field from that trigger that Zapier needs to pass with this API call (which should include the same data as the *Field Name* you selected before for the dynamic menu).
{" "}
{" "}
You'll need to add a [Search Action](/integrations/build/action#how-to-add-a-search-action) to find the items used in this dropdown menu. Then check the *Add a search to this field* option under the dynamic dropdown you've built, choose that action, and enter the ID of the field from that trigger that Zapier needs to pass with this API call (which should include the same data as the *Field Name* you selected before for the dynamic menu).
{" "}
 {" "}
When users click or add a search step in their Zap, Zapier will add a new search step before this action step.
This allows the user to enter the details to search for the item they need, and Zapier will automatically map the correct output value from that search to this dynamic dropdown field [as a custom value](https://help.zapier.com/hc/en-us/articles/8496241696141-Add-custom-values-to-dropdown-menu-fields-in-Zaps#01H7FR09FBWT481ZJ77VVR0HBR).
We have a video tutorial on Dynamic Dropdowns which you can view here:
## Reorder input fields
Reordering input fields in triggers or actions can help improve readability and usability.
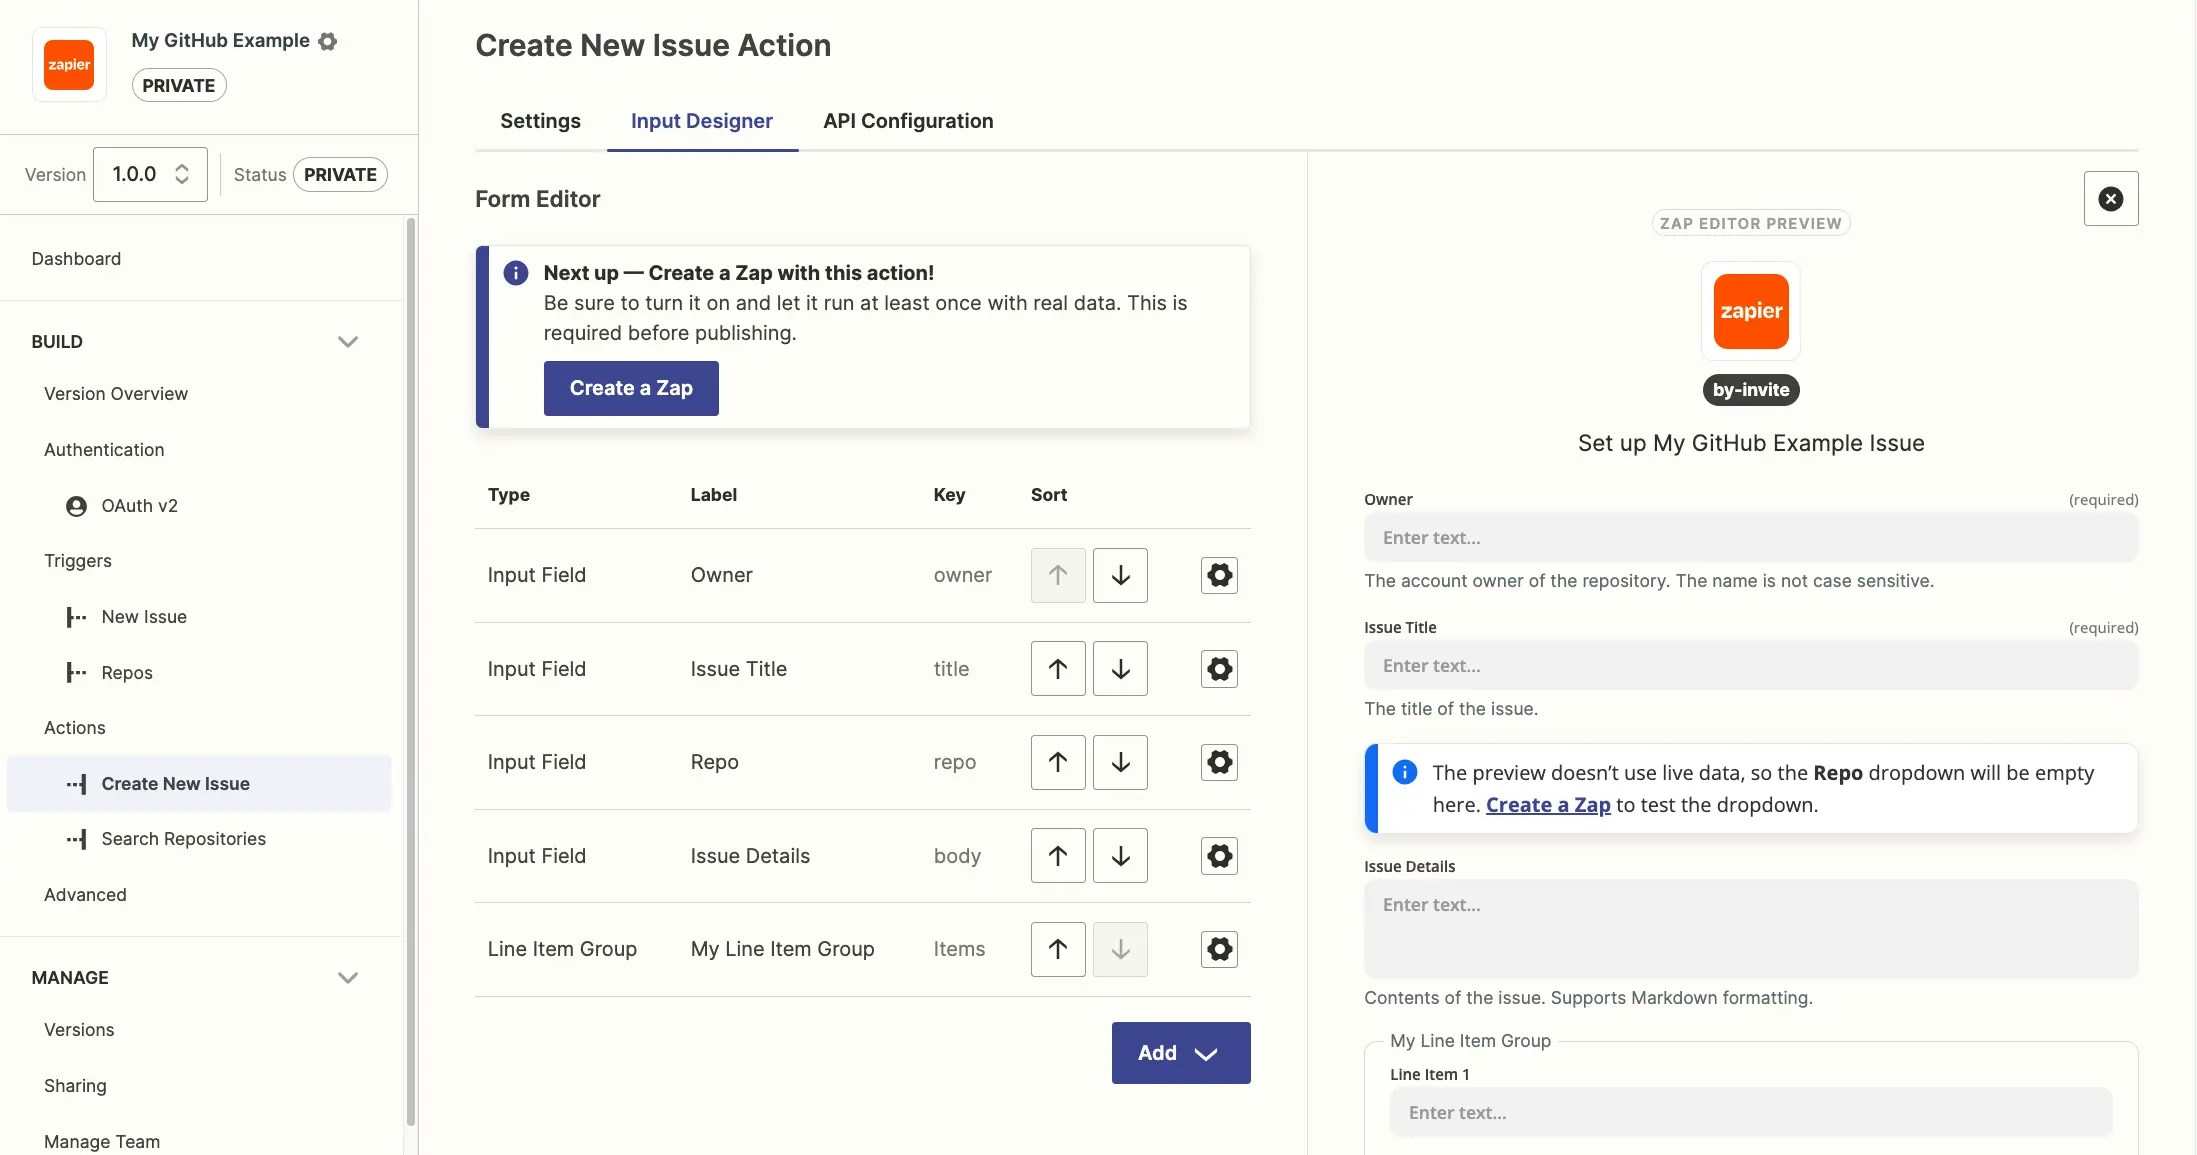
List the most important, required fields first, with less important, optional fields near the bottom. Have related fields (such as first and last name) near each other. Ordering fields in Zapier similar to the order of fields in any input forms in your app will increase ease of use.
{" "}
{" "}
When users click or add a search step in their Zap, Zapier will add a new search step before this action step.
This allows the user to enter the details to search for the item they need, and Zapier will automatically map the correct output value from that search to this dynamic dropdown field [as a custom value](https://help.zapier.com/hc/en-us/articles/8496241696141-Add-custom-values-to-dropdown-menu-fields-in-Zaps#01H7FR09FBWT481ZJ77VVR0HBR).
We have a video tutorial on Dynamic Dropdowns which you can view here:
## Reorder input fields
Reordering input fields in triggers or actions can help improve readability and usability.
List the most important, required fields first, with less important, optional fields near the bottom. Have related fields (such as first and last name) near each other. Ordering fields in Zapier similar to the order of fields in any input forms in your app will increase ease of use.
{" "}
 {" "}
In your trigger or action settings:
1. Click the **Input Designer** tab.
2. In the *Sort* column, click the **up**
{" "}
{" "}
In your trigger or action settings:
1. Click the **Input Designer** tab.
2. In the *Sort* column, click the **up**
{" "}
 {" "}
or **down**
{" "}
{" "}
or **down**
{" "}
 {" "}
arrow to move the fields to the order you want in the Form Editor screen.
3. The preview on the right shows how the finished form looks to users inside Zapier.
4. A pop-up message will appear to confirm your changes have been saved.
## Remove input fields
Make sure to delete only unnecessary fields, as a previous version of the input form cannot be restored. You cannot remove input fields from public integrations; you must [create a new version of your integration](/integrations/manage/versions) before changing input fields and [consider the impacts of the change](/integrations/manage/planning-changes#changing-form-field-keys).
In your trigger or action settings:
1. Click the **Input Designer** tab.
2. Click the **gear icon**
{" "}
arrow to move the fields to the order you want in the Form Editor screen.
3. The preview on the right shows how the finished form looks to users inside Zapier.
4. A pop-up message will appear to confirm your changes have been saved.
## Remove input fields
Make sure to delete only unnecessary fields, as a previous version of the input form cannot be restored. You cannot remove input fields from public integrations; you must [create a new version of your integration](/integrations/manage/versions) before changing input fields and [consider the impacts of the change](/integrations/manage/planning-changes#changing-form-field-keys).
In your trigger or action settings:
1. Click the **Input Designer** tab.
2. Click the **gear icon**  beside the input field you want to delete.
3. Click **Delete**.
4. Click **Confirm** to remove the input field from your integration.
5. A pop-up message will appear to confirm your changes have been saved.
***
*Need help? [Tell us about your problem](https://developer.zapier.com/contact) and we'll connect you with the right resource or contact support.*
beside the input field you want to delete.
3. Click **Delete**.
4. Click **Confirm** to remove the input field from your integration.
5. A pop-up message will appear to confirm your changes have been saved.
***
*Need help? [Tell us about your problem](https://developer.zapier.com/contact) and we'll connect you with the right resource or contact support.*