> ## Documentation Index
> Fetch the complete documentation index at: https://docs.zapier.com/llms.txt
> Use this file to discover all available pages before exploring further.
# Add a create action
## 1. Add the action settings
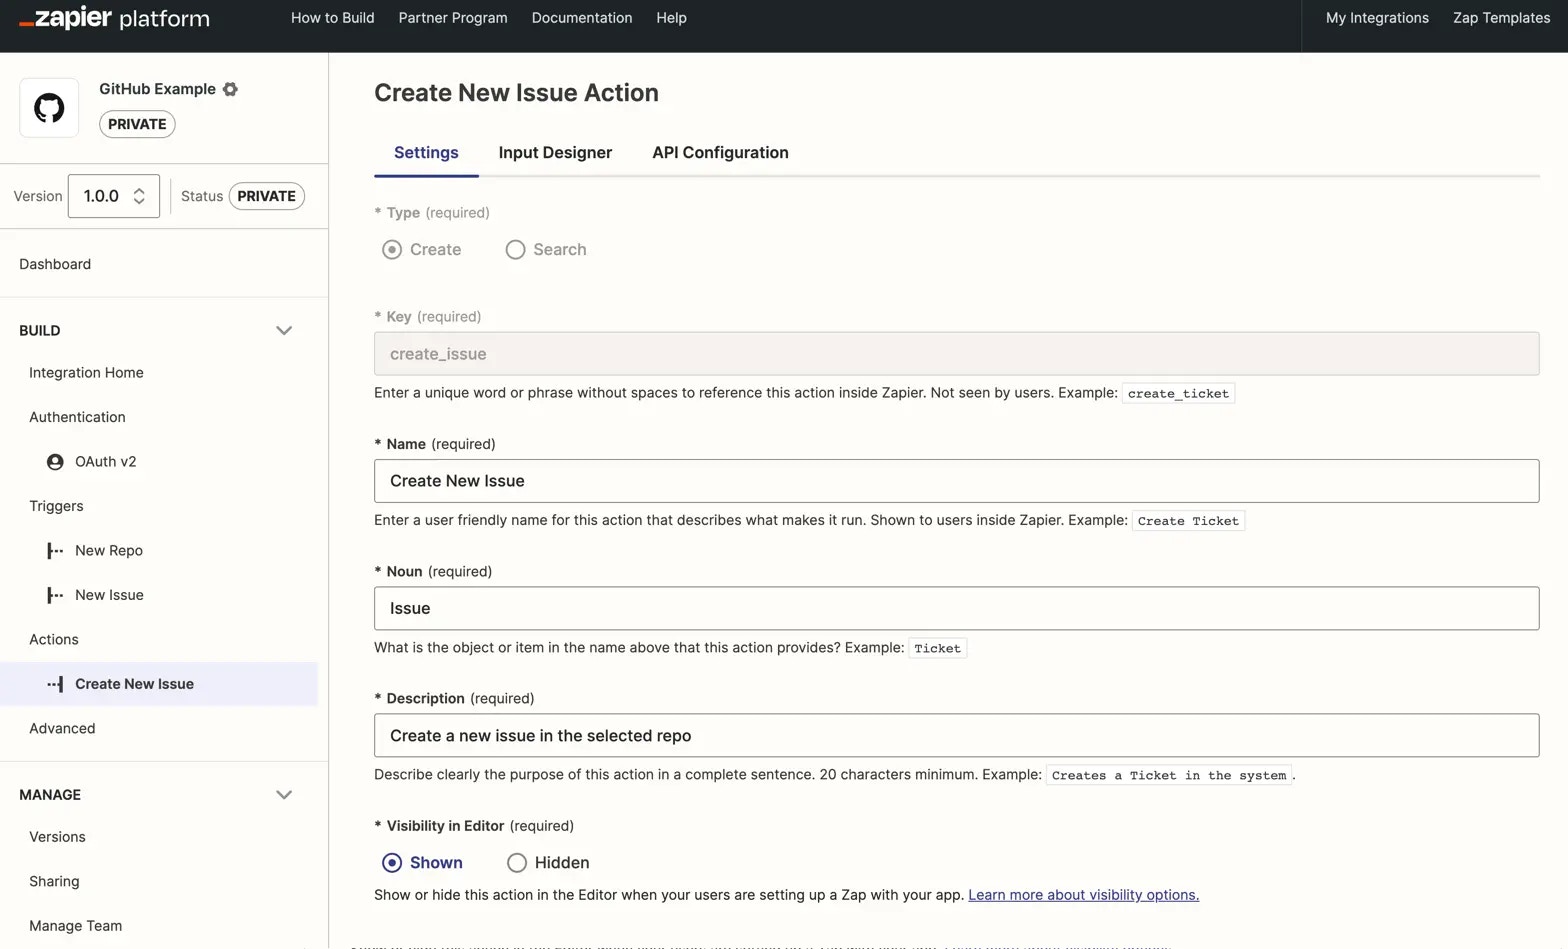
* Open the *Actions* tab in Zapier's Platform UI from the sidebar on the left, and select **Add Action**, selecting your action type. New actions are *create* type by default, and they add new data or update existing data to your app.
 **Note**: You cannot change an action type once you click *Save and Continue*
on a new action. If you need to change the action type, delete the action and
recreate it.
* On the Settings page, specify the following:
– **Key**: A unique identifier for this action, used to reference the action inside Zapier. Does not need to be the same identifier as used in your API. Not shown to users.
– **Name**: A human friendly plain text name for this action, typically with a verb such as *Add* or *Create* followed by the name of the item this action will create in your app. The title-case name is shown inside the Zap editor and on Zapier's app directory marketing pages.
– **Noun**: A single noun that describes what this action creates, used by Zapier to auto-generate text in Zaps about your action.
– **Description**: A plain text sentence that describes what the action does and when it should be used. Shown inside the Zap editor and on Zapier's app directory marketing pages. Starts with the phrase “Creates a new”.
– **Visibility Options**: An option to select when this action will be shown. *Shown* is chosen by default. Choose `Hidden` if this action should not be shown to users. `Hidden` is usually selected if you build a *create* action solely to [pair with a search action](/integrations/build/search-or-create) but do not want it used on its own.
* Click on the *Save and Continue* button.
## 2. Complete the Input Designer
On the *Input Designer* page, add user [input fields](/integrations/build/add-fields) for this action. All action steps *must* include an input form for Zapier to gather the data needed to create or find items in your app. Add at least one input field to your action.
Before building your action's input form, list each piece of data your app needs to create a new item. For example, if building an action to send an email, fields for the email address, subject, and email body would be needed. Your action will likely have several required fields, along with others that are optional, such as for tags or other details.
Add action fields for each piece of data your app needs to create or find this item in your app. Add the fields in the order they're listed in your app, with *required* fields first, for the best user experience.
## 3. Set up the API Configuration
The final page of building your action tells Zapier how to send the data to your API.
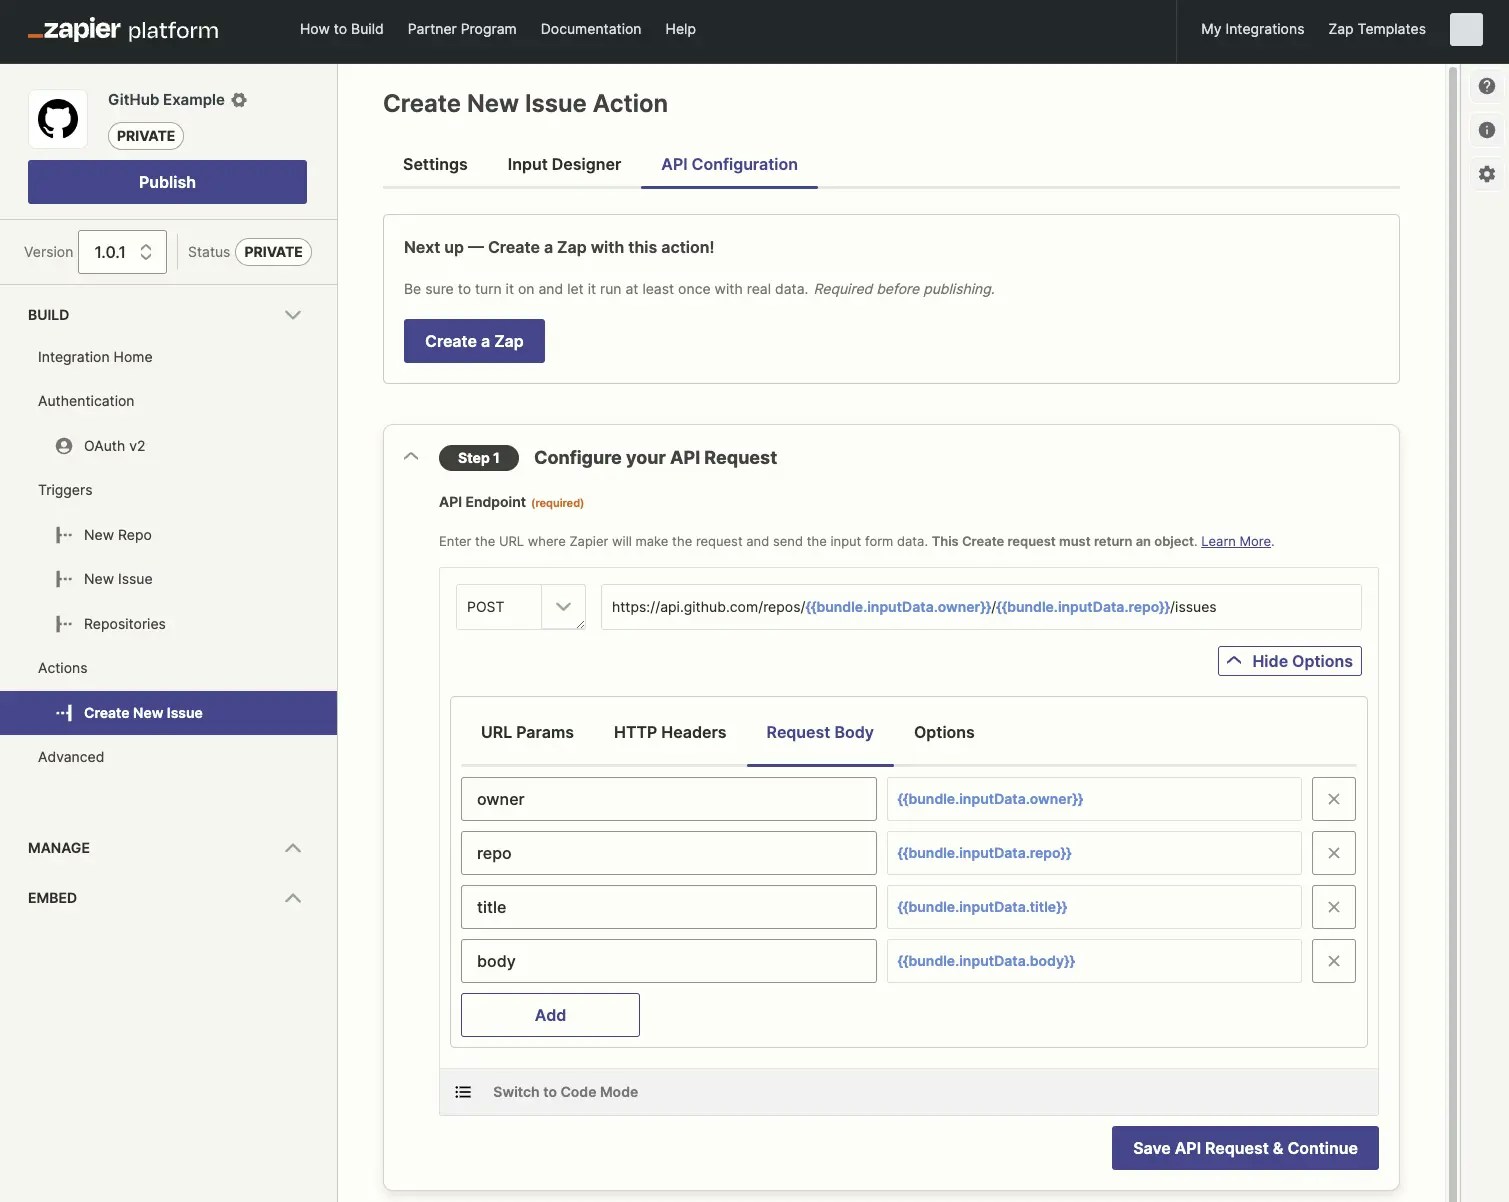
A `POST` call populates for *create* actions by default, sending a single item to the provided API endpoint. Zapier then expects a response with an object containing a single item, to be evaluated by [isPlainObject](https://lodash.com/docs#isPlainObject) and parsed into individual fields for use in subsequent Zap steps.
Select the correct API call if your app expects something other than the default, then paste the URL for your API call in the box under *API Endpoint*. Zapier will include each of your input form fields in the *Request Body* automatically.
If your API call expects input data in the core URL, reference any input field's key with the following text, replacing `key` with your field key:
`{{bundle.inputData.key}}`
The defaults on all other settings work for most basic API calls. If you need to configure more options, click *Show Options* to add URL Params, HTTP Headers, set your action to omit empty parameters, or customize the request body. Alternately, switch to [Code Mode](/integrations/build/code-mode) to write custom JavaScript code for your action.
**Note**: You cannot change an action type once you click *Save and Continue*
on a new action. If you need to change the action type, delete the action and
recreate it.
* On the Settings page, specify the following:
– **Key**: A unique identifier for this action, used to reference the action inside Zapier. Does not need to be the same identifier as used in your API. Not shown to users.
– **Name**: A human friendly plain text name for this action, typically with a verb such as *Add* or *Create* followed by the name of the item this action will create in your app. The title-case name is shown inside the Zap editor and on Zapier's app directory marketing pages.
– **Noun**: A single noun that describes what this action creates, used by Zapier to auto-generate text in Zaps about your action.
– **Description**: A plain text sentence that describes what the action does and when it should be used. Shown inside the Zap editor and on Zapier's app directory marketing pages. Starts with the phrase “Creates a new”.
– **Visibility Options**: An option to select when this action will be shown. *Shown* is chosen by default. Choose `Hidden` if this action should not be shown to users. `Hidden` is usually selected if you build a *create* action solely to [pair with a search action](/integrations/build/search-or-create) but do not want it used on its own.
* Click on the *Save and Continue* button.
## 2. Complete the Input Designer
On the *Input Designer* page, add user [input fields](/integrations/build/add-fields) for this action. All action steps *must* include an input form for Zapier to gather the data needed to create or find items in your app. Add at least one input field to your action.
Before building your action's input form, list each piece of data your app needs to create a new item. For example, if building an action to send an email, fields for the email address, subject, and email body would be needed. Your action will likely have several required fields, along with others that are optional, such as for tags or other details.
Add action fields for each piece of data your app needs to create or find this item in your app. Add the fields in the order they're listed in your app, with *required* fields first, for the best user experience.
## 3. Set up the API Configuration
The final page of building your action tells Zapier how to send the data to your API.
A `POST` call populates for *create* actions by default, sending a single item to the provided API endpoint. Zapier then expects a response with an object containing a single item, to be evaluated by [isPlainObject](https://lodash.com/docs#isPlainObject) and parsed into individual fields for use in subsequent Zap steps.
Select the correct API call if your app expects something other than the default, then paste the URL for your API call in the box under *API Endpoint*. Zapier will include each of your input form fields in the *Request Body* automatically.
If your API call expects input data in the core URL, reference any input field's key with the following text, replacing `key` with your field key:
`{{bundle.inputData.key}}`
The defaults on all other settings work for most basic API calls. If you need to configure more options, click *Show Options* to add URL Params, HTTP Headers, set your action to omit empty parameters, or customize the request body. Alternately, switch to [Code Mode](/integrations/build/code-mode) to write custom JavaScript code for your action.
 ## 4. Test your API request
Configure test data to [test the *create* action](/integrations/build/test-triggers-actions). Note that testing a POST or PUT request will create or update the item in your app.
## 5. Define your output
Define sample data and output fields following [the guide](/integrations/build/sample-data).
***
*Need help? [Tell us about your problem](https://developer.zapier.com/contact) and we'll connect you with the right resource or contact support.*
## 4. Test your API request
Configure test data to [test the *create* action](/integrations/build/test-triggers-actions). Note that testing a POST or PUT request will create or update the item in your app.
## 5. Define your output
Define sample data and output fields following [the guide](/integrations/build/sample-data).
***
*Need help? [Tell us about your problem](https://developer.zapier.com/contact) and we'll connect you with the right resource or contact support.*