> ## Documentation Index
> Fetch the complete documentation index at: https://docs.zapier.com/llms.txt
> Use this file to discover all available pages before exploring further.
# Send or receive dynamic user-defined fields through your API
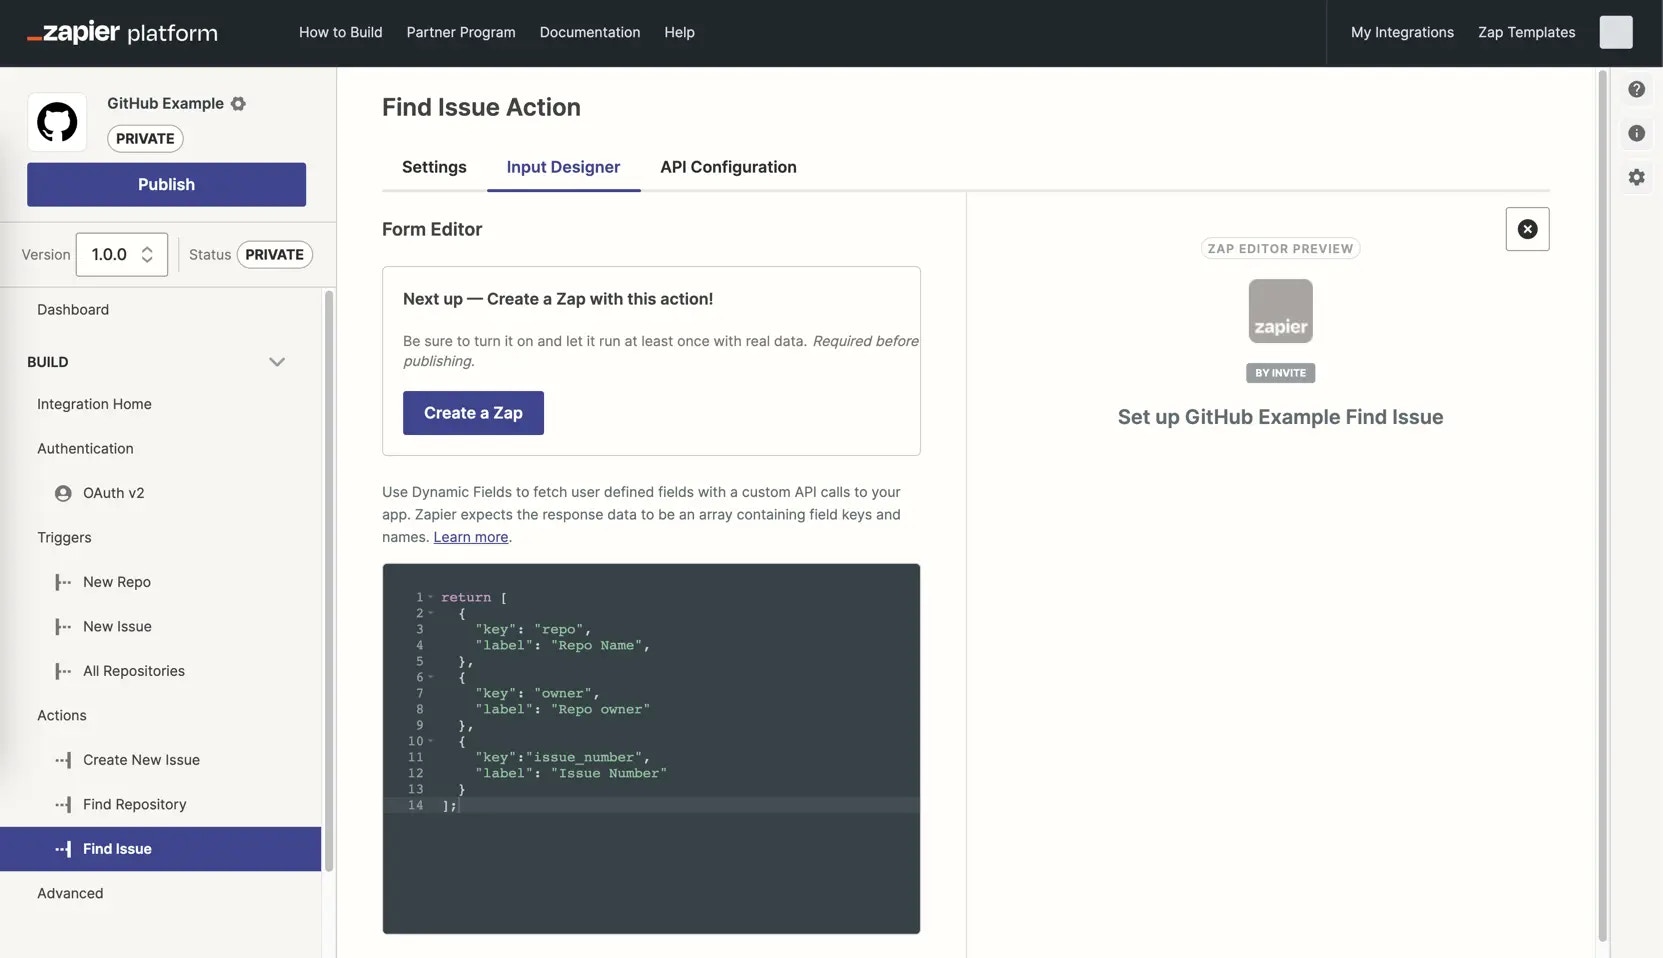
> Dynamic fields are a type of field built from an API call. Custom code runs to show fields based on other input field data. These are especially useful with project management apps, CRM apps, databases, and any other app where users can add custom, user-defined fields.
## Add a dynamic field
You can use dynamic fields, to retrieve fields in three different contexts:
* Whenever the value of a field with `altersDynamicFields` is changed.
* Whenever the *Set up* section for the action is opened in the Zap editor.
* Whenever the *Refresh Fields* button is used on the action.
In the [Platform UI](https://zapier.com/app/developer):
1. In the *Build* section in the left sidebar, click on your **action**.
2. Click the **Input Designer** tab.
3. Click **Add** and select **Dynamic Field**.
4. A code box will appear. Add your **JavaScript code** to make an API call and fetch the fields from your app's API. Use Zapier's `z.request` to make the API call. Your code should return each custom field's key and name to Zapier in an array, so they display correctly in the Zap editor. Learn more about using [Z Object to call a function](https://github.com/zapier/zapier-platform/blob/master/packages/cli/README.md#z-object).
5. Once you've added your JavaScript code, click **Save**.
**Note**:
* Do not rely on any input fields already having a value, since they won't have one the first time the Zap editor loads.
* Dynamic fields using `z.request` will not show in the Zap editor preview.
* Dynamic fields can only be added to actions, not triggers.
 ## Create a dynamic field based on previous input field data
In the [Platform UI](https://zapier.com/app/developer):
1. In the *Build* section in the left sidebar, click on your **action**.
2. Click the **Input Designer** tab.
3. Review your input field settings, you'll need at least one input field that has **Alters Dynamic Fields** selected. This is the field that Zapier will use to decide if the dynamic field should be shown.
4. Click **Add** and select **Dynamic Field**.
5. A code box will appear. Add your JavaScript code that evaluates data from previous fields (referencing `bundle.inputData.field_key` where `field_key` is replaced with the actual key of the prior input field that must be checked), including logic and details on another field to show depending on the value of the former.
6. Once you've added your JavasScript code, click **Save**.
## Send dynamic field data to your API
In the [Platform UI](https://zapier.com/app/developer):
1. In the *Build* section in the left sidebar, click on your **action**.
2. Click the **API Configuration** tab.
3. Click **Switch to Code Mode**
4. In the dialog box, click **Switch to Code Mode**
5. A code box will appear. Add your Javascript code, that include `body: { ...bundle.inputData }` to send every input field, including pre-defined or dynamic fields in the body of your API call to your app. You can also use `bundle.inputData.field_key` to include individual lists of dynamic fields.
6. Once you've added your JavasScript code, click **Save**.
## Test a dynamic field
To test how your dynamic fields will appear in the Zap editor:
1. [Create a new Zap](https://zapier.com/app/editor/).
2. Add the action to your Zap that includes your dynamic field. This will allow for you to test how your action will appear to users.
If you want more details about the API calls being made, in the [Platform UI](https://zapier.com/app/developer):
* In the *Manage* section in the left sidebar, click **Monitoring**.
* You'll see a graph and be able to click on data points to view events and details to troubleshoot your setup further.
***
*Need help? [Tell us about your problem](https://developer.zapier.com/contact) and we'll connect you with the right resource or contact support.*
## Create a dynamic field based on previous input field data
In the [Platform UI](https://zapier.com/app/developer):
1. In the *Build* section in the left sidebar, click on your **action**.
2. Click the **Input Designer** tab.
3. Review your input field settings, you'll need at least one input field that has **Alters Dynamic Fields** selected. This is the field that Zapier will use to decide if the dynamic field should be shown.
4. Click **Add** and select **Dynamic Field**.
5. A code box will appear. Add your JavaScript code that evaluates data from previous fields (referencing `bundle.inputData.field_key` where `field_key` is replaced with the actual key of the prior input field that must be checked), including logic and details on another field to show depending on the value of the former.
6. Once you've added your JavasScript code, click **Save**.
## Send dynamic field data to your API
In the [Platform UI](https://zapier.com/app/developer):
1. In the *Build* section in the left sidebar, click on your **action**.
2. Click the **API Configuration** tab.
3. Click **Switch to Code Mode**
4. In the dialog box, click **Switch to Code Mode**
5. A code box will appear. Add your Javascript code, that include `body: { ...bundle.inputData }` to send every input field, including pre-defined or dynamic fields in the body of your API call to your app. You can also use `bundle.inputData.field_key` to include individual lists of dynamic fields.
6. Once you've added your JavasScript code, click **Save**.
## Test a dynamic field
To test how your dynamic fields will appear in the Zap editor:
1. [Create a new Zap](https://zapier.com/app/editor/).
2. Add the action to your Zap that includes your dynamic field. This will allow for you to test how your action will appear to users.
If you want more details about the API calls being made, in the [Platform UI](https://zapier.com/app/developer):
* In the *Manage* section in the left sidebar, click **Monitoring**.
* You'll see a graph and be able to click on data points to view events and details to troubleshoot your setup further.
***
*Need help? [Tell us about your problem](https://developer.zapier.com/contact) and we'll connect you with the right resource or contact support.*