# Zapier Developer Documentation
Source: https://docs.zapier.com/index
Documentation for building integrations, building with the SDK, MCP or embedding Zapier.
Developer Documentation
Build with Zapier
Documentation for building integrations, building with the SDK, MCP or embedding Zapier.
Explore by product
Build a Zapier integration - design triggers and actions for your product, wire up
authentication, then publish to the App Directory.
Bring Zapier's automation into your own product so customers can build workflows and
run actions without leaving your app.
Connect AI assistants to Zapier through MCP so they can call any app action on the
platform using natural language.
Use the Zapier SDK to run actions and manage connections from your backend or agents,
all in a few lines of code.
# Core reference
Source: https://docs.zapier.com/integrations/build-cli/core
Reference for `zapier-platform-core`
Most functions get called with `(z, bundle)`. This document is a reference for how to use these objects.
> If you use TypeScript, you can import `ZObject`, `Bundle` and `PerformFunction` from `zapier-platform-core`.
## `z` Object
We provide several methods off of the `z` object, which is provided as the first argument to all function calls in your integration.
> The `z` object is passed into your functions as the first argument - IE: `perform: (z) => {}`.
### `z.request([url], options)`
`z.request([url], options)` is a promise based HTTP client with some Zapier-specific goodies. See [Making HTTP Requests](/integrations/build-cli/overview#making-http-requests). `z.request()` will [percent-encode](https://developer.mozilla.org/en-US/docs/Glossary/Percent-encoding) non-ascii characters and these reserved characters: ``:$/?#[]@$&+,;=^@`\``. Use [`skipEncodingChars`](https://github.com/zapier/zapier-platform/blob/main/packages/schema/docs/build/schema.md#requestschema) to modify this behaviour.
### `z.console`
`z.console.log(message)` is a logging console, similar to Node.js `console` but logs remotely, as well as to stdout in tests. See [Log Statements](/integrations/build-cli/overview#console-logging)
### `z.dehydrate(func, inputData)`
`z.dehydrate(func, inputData)` is used to lazily evaluate a function, perfect to avoid API calls during polling or for reuse. See [Dehydration](/integrations/build-cli/overview#dehydration).
### `z.dehydrateFile(func, inputData)`
`z.dehydrateFile` is used to lazily download a file, perfect to avoid API calls during polling or for reuse. See [File Dehydration](/integrations/build-cli/overview#file-dehydration).
### `z.stashFile(bufferStringStream, [knownLength], [filename], [contentType])`
`z.stashFile(bufferStringStream, [knownLength], [filename], [contentType])` is a promise based file stasher that returns a URL file pointer. See [Stashing Files](/integrations/build-cli/overview#stashing-files).
### `z.JSON`
`z.JSON` is similar to the JSON built-in like `z.JSON.parse('...')`, but catches errors and produces nicer tracebacks.
### `z.hash()`
`z.hash()` is a crypto tool for doing things like `z.hash('sha256', 'my password')`
### `z.errors`
`z.errors` is a collection error classes that you can throw in your code, like `throw new z.errors.HaltedError('...')`.
The available errors are:
* `Error` (*added in v9.3.0*) - Stops the current operation, allowing for (auto) replay. Read more on [General Errors](/integrations/build-cli/overview#general-errors)
* `HaltedError` - Stops current operation, but will never turn off Zap. Read more on [Halting Execution](/integrations/build-cli/overview#halting-execution)
* `ExpiredAuthError` - Stops the current operation and emails user to manually reconnect. Read more on [Stale Authentication Credentials](/integrations/build-cli/overview#stale-authentication-credentials)
* `RefreshAuthError` - (OAuth2 or Session Auth) Tells Zapier to refresh credentials and retry operation. Read more on [Stale Authentication Credentials](/integrations/build-cli/overview#stale-authentication-credentials)
* `ThrottledError` (*new in v11.2.0*) - Tells Zapier to retry the current operation after a delay specified in seconds. Read more on [Handling Throttled Requests](/integrations/build-cli/overview#handling-throttled-requests)
For more details on error handling in general, see [here](/integrations/build-cli/overview#error-handling).
### `z.cursor`
The `z.cursor` object exposes two methods:
* `z.cursor.get(): Promise`
* `z.cursor.set(string): Promise`
Any data you `set` will be available to that Zap for about an hour (or until it's overwritten). For more information, see: [paging](/integrations/build-cli/overview#paging).
### `z.generateCallbackUrl()`
The `z.generateCallbackUrl()` will return a callback URL your app can `POST` to later for handling long running tasks (like transcription or encoding jobs). In the meantime, the Zap and Task will wait for your response and the user will see the Task marked as waiting.
For example, in your `perform` you might do:
```js theme={null}
const perform = async (z, bundle) => {
// something like this url:
// https://zapier.com/hooks/callback/123/abcdef01-2345-6789-abcd-ef0123456789/abcdef0123456789abcdef0123456789abcdef01/
// consider checking bundle.meta.isLoadingSample to determine if this is a test run or real run!
const callbackUrl = z.generateCallbackUrl();
await z.request({
url: "https://example.com/api/slow-job",
method: "POST",
body: {
// ... whatever your integration needs
url: callbackUrl,
},
});
return { hello: "world" }; // available later in bundle.outputData
};
```
And in your own `/api/slow-job` view (or more likely, an async job) you'd make this request to Zapier when the long-running job completes to populate `bundle.cleanedRequest`:
```http theme={null}
POST /hooks/callback/123/abcdef01-2345-6789-abcd-ef0123456789/abcdef0123456789abcdef0123456789abcdef01/ HTTP/1.1
Host: zapier.com
Content-Type: application/json
{"foo":"bar"}
```
> Callbacks are fully supported during sample testing in the Zap Editor, including `performResume` execution. However, when possible, it's preferable to avoid using callbacks during sampling (check `bundle.meta.isLoadingSample`) for a better testing experience.
By default the payload `POST`ed to the callback URL will augment the data returned from the initial `perform` to compose the final value.
If you need to customize what the final value should be you can define a `performResume` method that receives three bundle properties:
* `bundle.outputData` is `{"hello": "world"}`, the data returned from the initial `perform`
* `bundle.cleanedRequest` is `{"foo": "bar"}`, the payload from the callback URL
* `bundle.rawRequest` is the full request object corresponding to `bundle.cleanedRequest`
```js theme={null}
const performResume = async (z, bundle) => {
// this will give a final value of: {"hello": "world", "foo": "bar"}
// which is the default behavior when a custom `performResume` is not
// defined.
return { ...bundle.outputData, ...bundle.cleanedRequest };
};
```
> The app will have a maximum of 30 days to `POST` to the callback URL. If a user deletes or modifies the Zap or Task in the meantime, we will not resume the task.
Some considerations:
* `performResume` is not supported by the Platform UI at the moment. It can only be used by integrations built with the CLI.
* In a search-or-write step, if the search part fails and proceeds to the write part, the callback URL generated for the write step might not be recognized or waited for. This can result in the `performResume` operation not being executed, leading to issues in the task flow.
* When migrating actions that use `performResume`, it is important to ensure that the `performResume` code for the new API is backward compatible. This ensures that if a migration occurs while a run is waiting for a callback, it will succeed after being migrated
## `bundle` Object
This object holds the user's auth details and the data for the API requests.
> The `bundle` object is passed into your functions as the second argument - IE: `perform: (z, bundle) => {}`.
### `bundle.authData`
`bundle.authData` is user-provided authentication data, like `api_key` or `access_token`. [Read more on authentication.](/integrations/build-cli/overview#authentication)
### `bundle.inputData`
`bundle.inputData` is user-provided data for this particular run of the trigger/search/create, as defined by the [`inputFields`](/integrations/build-cli/input-fields). For example:
```js theme={null}
{
createdBy: 'his name is Bobby Flay',
style: 'he cooks mediterranean',
scheduledAt: "2021-09-09T09:00:00-07:00"
}
```
### `bundle.inputDataRaw`
`bundle.inputDataRaw` is like `bundle.inputData`, but before processing such as interpreting friendly datetimes and rendering `{{curlies}}`:
```js theme={null}
{
createdBy: 'his name is {{123__chef_name}}',
style: 'he cooks {{456__style}}',
scheduledAt: "today"
}
```
> "curlies" represent data mapped in from previous steps. They take the form `{{NODE_ID__key_name}}`.
You'll usually want to use `bundle.inputData` instead.
### `bundle.meta`
`bundle.meta` contains extra information useful for doing advanced behaviors depending on what the user is doing. It has the following options:
| key | default | description |
| -------------------------- | ----------- | ----------------------------------------------------------------------------------------------------------------------------------------------------------------------------------------------------------------------------------------------------------------------------------------------------------------------------------------------------------------------------------------------------------------------------------------------------------------------------------------------------- |
| `isLoadingSample` | `false` | If true, this run was initiated manually via the Zap Editor |
| `isFillingDynamicDropdown` | `false` | If true, this poll is being used to populate a dynamic dropdown. You only need to return the fields you specified (such as `id` and `name`), though returning everything is fine too |
| `isPopulatingDedupe` | `false` | If true, the results of this poll will be used to initialize the deduplication list rather than trigger a zap. You should grab as many items as possible. See also: [deduplication](/integrations/build/deduplication) |
| `limit` | `-1` | The number of items you should fetch. `-1` indicates there's no limit. Build this into your calls insofar as you are able |
| `page` | `0` | Used in [paging](/integrations/build-cli/faqs#whats-the-deal-with-pagination-when-is-it-used-and-how-does-it-work) to uniquely identify which page of results should be returned |
| `timezone` | `null` | The timezone the user has configured for their account or specfic automation. Received as [TZ identifier](https://en.wikipedia.org/wiki/List_of_tz_database_time_zones), such as "America/New\_York". |
| `isTestingAuth` | `false` | (legacy property) If true, the poll was triggered by a user testing their account (via [clicking "test"](https://cdn.zapier.com/storage/photos/5c94c304ce11b02c073a973466a7b846.png) or during setup). We use this data to populate the auth label, but it's mostly used to verify we made a successful authenticated request |
| `withSearch` | `undefined` | When a create is called as part of a search-or-create step, `withSearch` will be the key of the search. |
| `inputFields` | `{}` | Contains extra input field context if one or more input fields define this data via their respective `meta` property. If defined, then this object's keys are the respective input field `key` values, and the values for each `key` are an object corresponding to that input field's `meta` object value. See the [FieldSchema reference](https://github.com/zapier/zapier-platform/blob/main/packages/schema/docs/build/schema.md#fieldschema) for more details on how to define input field meta. |
> Before v8.0.0, the information in `bundle.meta` was different. See [the old docs](https://github.com/zapier/zapier-platform-cli/blob/a058e6d538a75d215d2e0c52b9f49a97218640c4/README.md#bundlemeta) for the previous values and [the wiki](https://github.com/zapier/zapier-platform/wiki/bundle.meta-changes) for a mapping of old values to new.
Here's an example of a polling trigger that is also used to power a dynamic dropdown:
```js theme={null}
const perform = async (z, bundle) => {
const params = { per_page: 100 }; // poll for the most recent 100 teams
if (bundle.meta.isFillingDynamicDropdown) {
// dynamic dropdowns support pagination
params.per_page = 30;
params.offset = params.per_page * bundle.meta.page;
}
const response = await z.request({
url: `${API_BASE_URL}/teams`,
params,
});
return response.json;
};
// ...
```
### `bundle.rawRequest`
> `bundle.rawRequest` is only available in the `perform` for webhooks, `getAccessToken` for OAuth authentication methods, and `performResume` in a callback action.
`bundle.rawRequest` holds raw information about the HTTP request that triggered the `perform` method or that represents the user's browser request that triggered the `getAccessToken` call:
```
{
method: 'POST',
querystring: 'foo=bar&baz=qux',
headers: {
'Content-Type': 'application/json'
},
content: '{"hello": "world"}'
}
```
In `bundle.rawRequest`, headers other than `Content-Length` and `Content-Type` will be prefixed with `Http-`, and all headers will be named in Camel-Case. For example, the header `X-Time-GMT` would become `Http-X-Time-Gmt`.
### `bundle.cleanedRequest`
> `bundle.cleanedRequest` is only available in the `perform` for webhooks, `getAccessToken` for OAuth authentication methods, and `performResume` in a callback action.
`bundle.cleanedRequest` will return a formatted and parsed version of the request. Some or all of the following will be available:
```
{
method: 'POST',
querystring: {
foo: 'bar',
baz: 'qux'
},
headers: {
'Content-Type': 'application/json'
},
content: {
hello: 'world'
}
}
```
### `bundle.outputData`
> `bundle.outputData` is only available in the `performResume` in a callback action.
`bundle.outputData` will return a whatever data you originally returned in the `perform`, allowing you to mix that with `bundle.rawRequest` or `bundle.cleanedRequest`.
### `bundle.targetUrl`
> `bundle.targetUrl` is only available in the `performSubscribe` and `performUnsubscribe` methods for webhooks.
This the URL to which you should send hook data. It'll look something like [`https://hooks.zapier.com/1234/abcd`.](https://hooks.zapier.com/1234/abcd.) We provide it so you can make a POST request to your server. Your server should store this URL and use is as a destination when there's new data to report.
For example:
```js theme={null}
const subscribeHook = async (z, bundle) => {
const options = {
url: "https://57b20fb546b57d1100a3c405.mockapi.io/api/hooks",
method: "POST",
body: {
url: bundle.targetUrl, // bundle.targetUrl has the Hook URL this app should call
},
};
const response = await z.request(options);
return response.data; // or response.json if you're using core v9 or older
};
module.exports = {
// ...
performSubscribe: subscribeHook,
// ...
};
```
Read more in the [REST hook example](https://github.com/zapier/zapier-platform/blob/main/example-apps/rest-hooks/triggers/recipe.js).
### `bundle.subscribeData`
> `bundle.subscribeData` is available in the `perform` and `performUnsubscribe` method for webhooks.
This is an object that contains the data you returned from the `performSubscribe` function. It should contain whatever information you need send a `DELETE` request to your server to stop sending webhooks to Zapier.
Read more in the [REST hook example](https://github.com/zapier/zapier-platform/blob/main/example-apps/rest-hooks/triggers/recipe.js).
## `bufferedBundle` Object
*Added in v15.15.0.*
This object holds a user's auth details (`bufferedBundle.authData`) and the buffered data (`bufferedBundle.buffer`) for the API requests. It is used only with a `create` action's `performBuffer` function.
> The `bufferedBundle` object is passed into the `performBuffer` function as the second argument - IE: `performBuffer: async (z, bufferedBundle) => {}`.
### `bufferedBundle.authData`
It is a user-provided authentication data, like `api_key` or `access_token`. [Read more on authentication.](/integrations/build-cli/overview#authentication)
### `bufferedBundle.groupedBy`
It is a user-provided data for a set of selected [`inputFields`](/integrations/build-cli/input-fields) to group the multiple runs of a `create` action by.
### `bufferedBundle.buffer`
It is an array of objects of user-provided data and some meta data to allow multiple runs of a `create` action be processed in a single API request.
#### `bufferedBundle.buffer[].inputData`
It is a user-provided data for a particular run of a `create` action in the buffer, as defined by the [`inputFields`](/integrations/build-cli/input-fields).
#### `bufferedBundle.buffer[].meta`
It contains an idempotency `id` provided to the `create` action to identify each run's data in the buffered data.
# Download the source code of a CLI integration
Source: https://docs.zapier.com/integrations/build-cli/download-source-code
If at any point you do not have the source code for your CLI integration and need it to make changes, you can download a zip file of the source code directly from the Platform UI.
## Prerequisites
Before doing this, you would have to ensure that:
* You are an admin for the integration. If you are not, you can have an admin [invite you](https://docs.zapier.com/integrations/manage/add-team) to be a member of the integration team.
* Your dev environment meets the [requirements for running Platform CLI](https://docs.zapier.com/integrations/build-cli/overview#requirements) with the proper version of Node.js installed.
* You have installed the Platform CLI tool in your local environment and set up your authentication.
```bash theme={null}
# install the CLI globally
npm install -g zapier-platform-cli
# setup auth to Zapier's platform with a deploy key
zapier-platform login
```
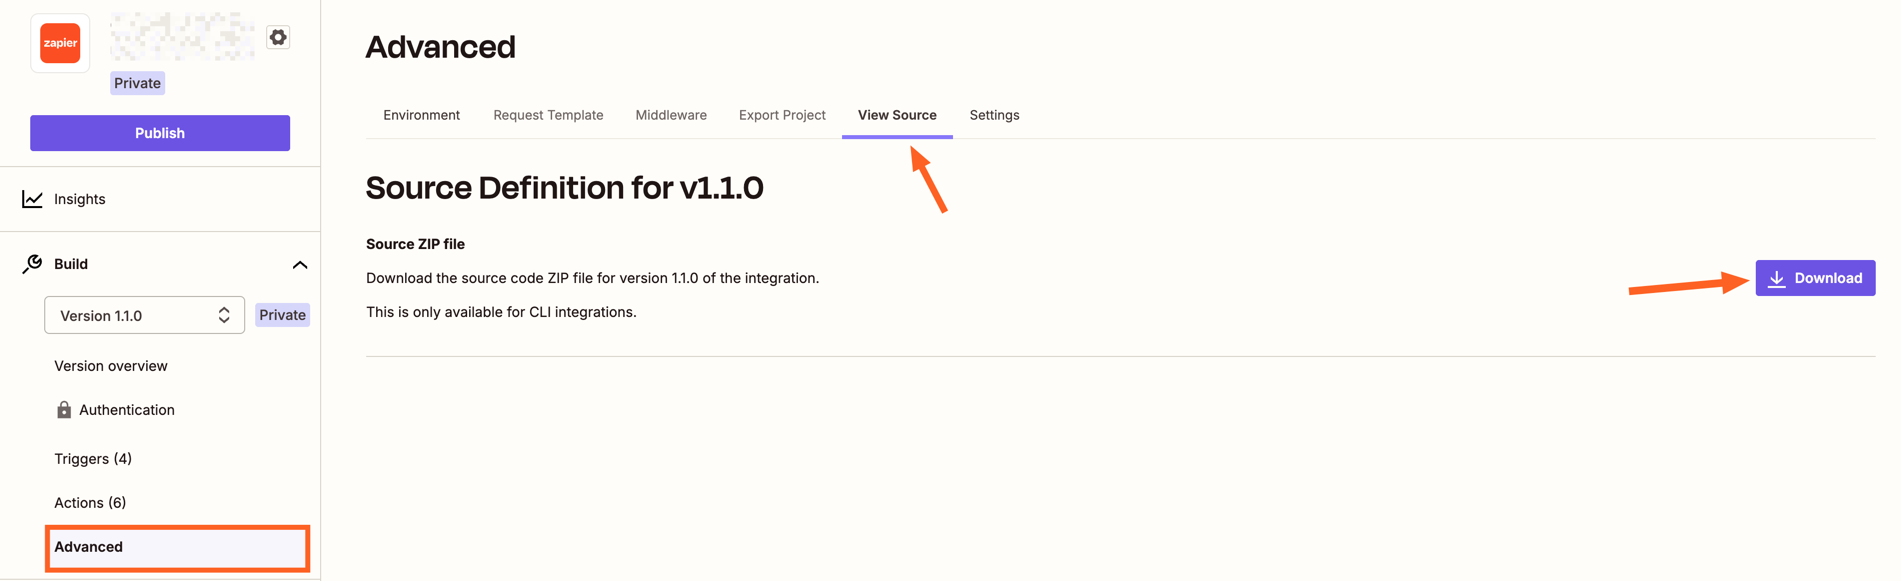
## Downloading the source code
The steps to downloading the source code are:
1. Log in to the Platform UI and access the CLI integration for which you would like to get the source code.
2. On the sidebar, click on “Advanced”.
3. Go to the “View Source” section.
4. Click the “Download” button
Note that, after getting the source code, you would need to go into the directory and run the `npm install` command in order to install all the libraries needed for your integration. Then you can start making changes to the integration code, following our [best practices](https://docs.zapier.com/integrations/build-cli/overview).
***
[*Need help? Tell us about your problem and we'll connect you with the right resource or contact support.*](https://developer.zapier.com/contact)
# Dynamic dropdowns
Source: https://docs.zapier.com/integrations/build-cli/dynamic-dropdowns
Sometimes, API endpoints require clients to specify a parent object in order to create or access the child resources. For instance, specifying a spreadsheet id in order to retrieve its worksheets. Since people don't speak in auto-incremented ID's, it is necessary that Zapier offer a simple way to select that parent using human readable handles.
Our solution is to present users a dropdown that is populated by making a live API call to fetch a list of parent objects. We call these special dropdowns "dynamic dropdowns."
## Definition
To define one you include the `dynamic` property on the `inputFields` object. The value for the property is a dot-separated *string* concatenation.
```js theme={null}
//...
issue: {
key: 'issue',
//...
create: {
//...
operation: {
inputFields: [
{
key: 'project_id',
required: true,
label: 'This is a dynamic dropdown',
dynamic: 'project.id.name'
}, // will call the trigger with a key of project
{
key: 'title',
required: true,
label: 'Title',
helpText: 'What is the name of the issue?'
}
]
}
}
}
```
The dot-separated string concatenation follows this pattern:
* The key of the trigger you want to use to power the dropdown. *required*
* The value to be made available in bundle.inputData. *required*
* The human friendly value to be shown on the left of the dropdown in bold. *optional*
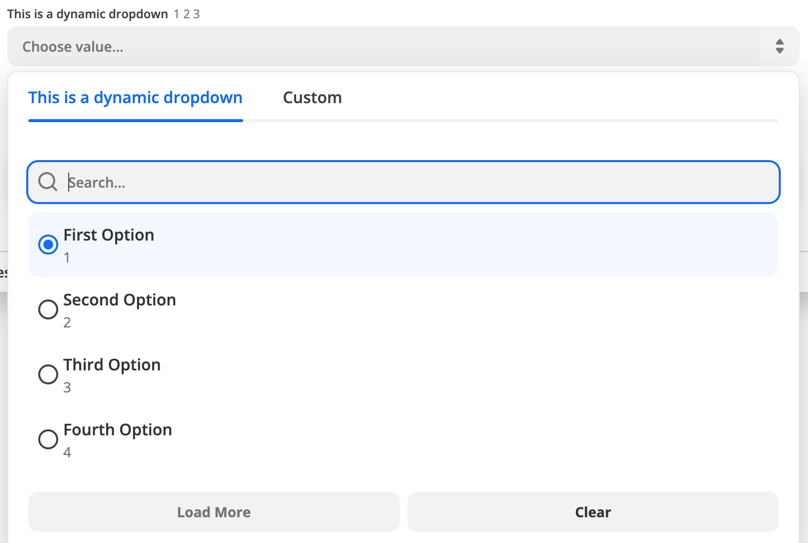
In the above code example the dynamic property makes reference to a trigger with a key of project. Assuming the project trigger returns an array of objects and each object contains an id and name key, i.e.
```js theme={null}
[
{ id: "1", name: "First Option", dateCreated: "01/01/2000" },
{ id: "2", name: "Second Option", dateCreated: "01/01/2000" },
{ id: "3", name: "Third Option", dateCreated: "01/01/2000" },
{ id: "4", name: "Fourth Option", dateCreated: "01/01/2000" },
];
```
The dynamic dropdown would look something like this.
## Use a resource
In the first code example the dynamic dropdown is powered by a trigger. You can also use a resource to power a dynamic dropdown. To do this combine the resource key and the resource method using camel case.
```js index.js theme={null}
const App = {
// ...
resources: {
project: {
key: "project",
// ...
list: {
// ...
operation: {
perform: () => {
return [{ id: 123, name: "Project 1" }];
}, // called for project_id dropdown
},
},
},
issue: {
key: "issue",
// ...
create: {
// ...
operation: {
inputFields: [
{
key: "project_id",
required: true,
label: "Project",
dynamic: "projectList.id.name",
}, // calls project.list
{
key: "title",
required: true,
label: "Title",
helpText: "What is the name of the issue?",
},
],
},
},
},
},
};
```
## Function-based dynamic dropdowns (perform)
*Added in v18.4.0*
Instead of powering a dropdown from a trigger or resource list via `dynamic`, you can power it with a **function** using `choices: { perform: getChoices }`. The function is called when the UI needs options and can use `bundle.inputData` (for example from other dropdowns) and support pagination.
**When to use:** Use this when you want a dedicated function to fetch options (e.g. from an API that isn't already a trigger or resource list), when you need **pagination** for many options, or when you want explicit **dependencies** declared on the field.
### Defining the choices function
Add `choices` with a `perform` function on the input field. The function receives `(z, bundle)` and can read `bundle.inputData` for values from other fields (e.g. a parent dropdown).
The function must return an object with a `results` key containing an array of choice items, and an optional `paging_token` for pagination:
```js theme={null}
{
results: [{ id, label }, ...],
paging_token: 'next_page_cursor' | null
}
```
Each item in `results` can be:
* A **string** — used as both the value and the label (the label is automatically humanized, e.g. `"my_option"` becomes `"My Option"`)
* An object with **`id`** (or `key` or `value`) and **`label`**
```js theme={null}
const getWorksheetChoices = async (z, bundle) => {
const response = await z.request({
url: 'https://example.com/api/worksheets',
params: { spreadsheet_id: bundle.inputData.spreadsheet_id },
});
return {
results: response.data.worksheets.map((w) => ({ id: w.id, label: w.name })),
paging_token: null,
};
};
// In your trigger or action's inputFields:
{
key: 'worksheet_id',
type: 'integer',
label: 'Worksheet',
required: true,
dependsOn: ['spreadsheet_id'],
choices: { perform: getWorksheetChoices },
}
```
### Pagination
If the API supports paging, set `paging_token` to a string value (typically a URL or cursor) that the platform will pass back on the next call via `bundle.meta.paging_token`. Return `paging_token: null` when there are no more pages.
On the first call, `bundle.meta.paging_token` will be `undefined`, so you can use it to determine whether to fetch the first page or a subsequent one.
```js theme={null}
const getPlanetChoices = async (z, bundle) => {
const url = bundle.meta.paging_token || "https://api.example.com/planets";
const response = await z.request({ url });
const data = response.data;
return {
results: data.items.map((p) => ({ id: p.id, label: p.name })),
paging_token: data.next_page_url || null,
};
};
```
### dependsOn
Use **`dependsOn`** to declare which input fields this dropdown depends on (e.g. a parent spreadsheet). The platform uses this for ordering and to ensure those values are in `bundle.inputData` when calling your `choices.perform` function. List the **keys** of the fields the user must fill first.
If `dependsOn` is not explicitly set, the platform will attempt to derive dependencies automatically from the field's `dynamic` property (if present).
```js theme={null}
{
key: 'worksheet_id',
label: 'Worksheet',
dependsOn: ['spreadsheet_id'],
choices: { perform: getWorksheetChoices },
}
```
You can combine `choices.perform` and `dependsOn` on the same field as in the first example in this section.
## Hide the trigger
In some cases you will need to power a dynamic dropdown but do not want to make the Trigger available to the end user. Here it is best practice to create the trigger and set `hidden: true` on it's display object.
```js theme={null}
const App = {
// ...
triggers: {
new_project: {
key: "project",
noun: "Project",
// `display` controls the presentation in the Zapier Editor
display: {
label: "New Project",
description: "Triggers when a new project is added.",
hidden: true,
},
operation: {
perform: projectListRequest,
},
},
another_trigger: {
// Another trigger definition...
},
},
};
```
## Dependencies between dropdowns
You can have multiple dynamic dropdowns in a single trigger or action. In some cases, a dynamic dropdown depends on the value chosen in another dynamic dropdown when making its API call. The [Google Sheets](https://zapier.com/apps/google-sheets/integrations#triggers-and-actions) integration displays an example of this pattern.
The example below illustrates a 'New Worksheet' trigger that populates a dynamic dropdown input field to select a worksheet:
```js theme={null}
{
key: "worksheet",
// ...
operation: {
// ...
perform: async (z, bundle) => {
const response = await z.request("https://example.com/api/v2/projects.json", {
params: {
spreadsheet_id: bundle.inputData.spreadsheet_id,
},
});
// response.throwForStatus() if you're using core v9 or older
return response.data; // or response.json if you're using core v9 or older
}
}
}
```
Assume there is another `New Records` trigger with `Spreadsheet` and `Worksheet` dynamic dropdown input fields, which have keys `spreadsheet_id` and `worksheet_id` respectively. The selected spreadsheet value is available via `bundle.inputData.spreadsheet_id` to be used by the `Worksheet` trigger.
```js theme={null}
const App = {
// ...
triggers: {
// ...
issue: {
key: "new_records",
// ...
operation: {
inputFields: [
{
key: "spreadsheet_id",
required: true,
label: "Spreadsheet",
dynamic: "spreadsheet.id.name",
altersDynamicFields: true,
},
{
key: "worksheet_id",
required: true,
label: "Worksheet",
dynamic: "worksheet.id.name",
},
],
},
},
},
};
```
> Note: Be mindful that a dynamic dropdown can depend on the value chosen in another dynamic dropdown. Two types of dependencies can exist between fields:
>
> *Requirement dependency*: Affects how dependent fields are enabled or disabled within the UI
>
> * Setting `required: false` makes a field optional and always enabled in the UI.
> * Having no required value set makes a field optional and disabled until the dependencies are selected.
>
> *Value dependency*: Affects how dynamic dropdown field options are retrieved
>
> * Setting a required value or not does not affect how the options of a dynamic field are retrieved.
>
> So, if you have an optional dynamic dropdown that depends on another dropdown input field, that field should not have `required: false` set. Input fields are optional by default, but setting `required: false` on an optional dynamic dropdown field that depends on another removes the requirement dependency relationship.
> In the example above, the `worksheet_id` input field will be disabled until the `spreadsheet_id` input field has a value in Zapier's products such as the Zap editor. Notice that setting `altersDynamicFields: true` signifies other input fields need to be recomputed whenever the value of that field changes.
## Detect when a trigger is used for a dynamic dropdown
If you want your trigger to perform specific scripting for a dynamic dropdown you will need to make use of `bundle.meta.isFillingDynamicDropdown`. This can be useful if need to make use of [pagination](/integrations/build-cli/faqs#whats-the-deal-with-pagination-when-is-it-used-and-how-does-it-work) in the dynamic dropdown to load more options.
```js theme={null}
const App = {
// ...
resources: {
project: {
key: "project",
// ...
list: {
// ...
operation: {
canPaginate: true,
perform: () => {
if (bundle.meta.isFillingDynamicDropdown) {
// perform pagination request here
} else {
return [{ id: 123, name: "Project 1" }];
}
},
},
},
},
issue: {
key: "issue",
// ...
create: {
// ...
operation: {
inputFields: [
{
key: "project_id",
required: true,
label: "Project",
dynamic: "projectList.id.name",
}, // calls project.list
{
key: "title",
required: true,
label: "Title",
helpText: "What is the name of the issue?",
},
],
},
},
},
},
};
```
## Link a search action
This feature makes it easier for users to handle the following scenario in a workflow that has multiple steps:
* The value for the input field depends on an output field from an earlier step.
* The value of that output field cannot be used directly.
* They need an additional search step that takes the output they *cannot* use directly, and translate it into something they *can*.
**Example:** Let's say the input field takes the ID of a lead. The user could select a lead from the dynamic dropdown, but then the workflow would act on the same lead every time it runs. An earlier step returns the email address of the lead, but not their ID. The user will need to prepend a search-step that takes the email address and returns the ID.
Users can do this themselves, but by using this feature, Zapier products can make this task easier.
### How it works for the user
In the Zap editor for example, dynamic dropdowns that use this feature will display a
button next to the dynamic dropdown. When the user clicks the button, the right search step is automatically prepended, and correct output field mapped into the dynamic dropdown.

### How to configure it
In the definition of the input field, configure `search` with a value of `.`.
* Replace `` with the `key` of the search action that should prepeded to the user's workflow.
* Replace `` with the `key` of the output field from that search action that should be mapped as value for the input field.
Here's an example:
```js theme={null}
{
key: 'project_id',
required: true,
label: 'Project',
dynamic: 'list_projects.id.name',
search: 'search_projects.id',
}
```
# Empty values in input data
Source: https://docs.zapier.com/integrations/build-cli/empty-values-in-input-data
Handing empty values in `bundle.inputData` in your `perform*` functions
zapier-platform-core v18 introduced a new flag named `cleanInputData`. This flag allows you to tell Zapier whether it should automatically remove empty values, including `null`, `[]` (empty arrays), and `{}` (empty objects), from `bundle.inputData` before passing it to your `perform*` functions.
By default, the `cleanInputData` flag defaults to true, which matches the behavior of all versions prior to v18. Starting with v18, we encourage you to **explicitly set this flag to false**, either globally in `App.flags` or per trigger/action in the `operation` object. For example:
```javascript theme={null}
const App = {
flags: {
cleanInputData: false, // global flag (defaults to true if not set)
},
triggers: {
recipe: {
operation: {
cleanInputData: false, // per-action flag, can be omitted if same as global
},
},
},
creates: {
recipe: {
operation: {
cleanInputData: true, // only enable for this action, overrides global flag
},
},
},
};
```
## When `cleanInputData` is true
When `cleanInputData` is true, Zapier removes any empty values **recursively** from `bundle.inputData` before passing it to your `perform*` (including `perform`, `performList`, `performGet`, etc) functions. For example, given the following input data:
```json theme={null}
{
"name": "Chocolate Cake",
"description": "",
"tags": [null, "", "dessert"],
"metadata": {
"author": null,
"ratings": {},
"comments": []
}
}
```
The resulting `bundle.inputData` passed to your `perform` function would be:
```json theme={null}
{
"name": "Chocolate Cake",
"tags": ["dessert"]
}
```
## When `cleanInputData` is false
When `cleanInputData` is false, Zapier preserves all empty values in `bundle.inputData`. Using the same example input data above, the resulting `bundle.inputData` would be:
```json theme={null}
{
"name": "Chocolate Cake",
"description": "",
"tags": [null, "", "dessert"],
"metadata": {
"author": null,
"ratings": {},
"comments": []
}
}
```
Your `perform` function would then need to handle these empty values appropriately.
We recommend setting `cleanInputData` to false and handling empty values explicitly in your code. This approach provides greater control for developers and avoids unexpected behavior, especially when dealing with nested input data (e.g., line items).
If your `perform*` functions didn't previously handle empty values, **setting
`cleanInputData` to false may break your code!** Make sure to test your
triggers or actions before rolling out this change to users.
# Frequently Asked Questions
Source: https://docs.zapier.com/integrations/build-cli/faqs
### Why doesn't Zapier support newer versions of Node.js?
We run your code on AWS Lambda, which only supports a few [versions](https://docs.aws.amazon.com/lambda/latest/dg/programming-model.html) of Node. Sometimes that doesn't include the latest version. Additionally, with integrations running on the Zapier platform, we have to be sure upgrading to the latest Node version will not have a negative impact.
### How do I manually set the Node.js version to run my integration with?
Update your `zapier-platform-core` dependency in `package.json`. Each major version ties to a specific version of Node.js. You can find the mapping [here](https://github.com/zapier/zapier-platform/blob/main/packages/cli/src/version-store.js). We only support the version(s) supported by [AWS Lambda](https://docs.aws.amazon.com/lambda/latest/dg/programming-model.html).
**IMPORTANT CAVEAT:** AWS periodically deprecates Node versions as they reach EOL. They announce this [on their blog](https://aws.amazon.com/blogs/developer/node-js-6-is-approaching-end-of-life-upgrade-your-aws-lambda-functions-to-the-node-js-10-lts/). Similar info and dates are available on [github](https://github.com/nodejs/Release). Well before this date, we'll have a version of `core` that targets the newer Node version.
If you don't upgrade before the cutoff date, there's a chance that AWS will throw an error when attempting to run your integration's code. If that's the case, we'll instead run it under the oldest Node version still supported. All that is to say, **we may run your code on a newer version of Node.js than you intend** if you don't update your integration's dependencies periodically.
### Does Zapier support XML (SOAP) APIs?
Not natively, but it can! Users have reported that the following `npm` modules are compatible with the CLI Platform:
* [pixl-xml](https://github.com/jhuckaby/pixl-xml)
* [xml2js](https://github.com/Leonidas-from-XIV/node-xml2js)
* [fast-xml-parser](https://github.com/NaturalIntelligence/fast-xml-parser)
Since core v10, it's possible for [shorthand requests](/integrations/build-cli/overview#shorthand-http-requests) to parse XML. Use an `afterResponse` [middleware](/integrations/build-cli/overview#using-http-middleware) that sets `response.data` to the parsed XML:
```js theme={null}
const xml = require("pixl-xml");
const App = {
// ...
afterResponse: [
(response, z, bundle) => {
// Only works on core v10+!
response.throwForStatus();
response.data = xml.parse(response.content);
return response;
},
],
// ...
};
```
### What's the deal with pagination? When is it used and how does it work?
Moved to [paging](/integrations/build-cli/overview#paging).
### How does deduplication work?
Each time a polling Zap runs, Zapier extracts a unique "primary key" for each item in the response. Zapier needs to decide which of the items should trigger the Zap. To do this, we compare the primary keys to all those we've seen before, trigger on new objects, and update the list of seen primary keys. When a Zap is turned on, we initialize the list of seen primary keys with a single poll. When it's turned off, we clear that list. For this reason, it's important that calls to a polling endpoint always return the newest items.
For example, the initial poll returns objects 4, 5, and 6 (where a higher primary key is newer). If a later poll increases the limit and returns objects 1-6, then 1, 2, and 3 will be (incorrectly) treated like new objects.
By default, the primary key is the item's `id` field. Since v15.6.0, you can customize the primary key by setting `primary` to true in `outputFields`.
There's a more in-depth explanation [here](/integrations/build/deduplication).
### Why are my triggers complaining if I don't provide an explicit `id` field?
For deduplication to work, we need to be able to identify and use a unique field. In older, legacy Zapier Web Builder integrations, we guessed if `id` wasn't present. In order to ensure we don't guess wrong, we now require that the developers send us an `id` field. If your objects have a differently-named unique field, feel free to adapt this snippet and ensure this test passes:
```js theme={null}
// ...
let items = response.data.items; // or response.json.items if you're using core v9 or older
return items.map((item) => {
item.id = item.contactId;
return item;
});
```
Since v15.6.0, instead of using the default `id` field, you can also define one or more `outputFields` as `primary`. For example:
```js theme={null}
{
triggers: {
recipe: {
operation: {
outputField: [
{ key: "userId", primary: true },
{ key: "slug", primary: true },
{ key: "name" },
];
}
}
}
}
```
will tell Zapier to use `(userId, slug)` as the unique primary key to deduplicate items when running a polling trigger.
**Limitation:** The `primary` option currently doesn't support mixing top-level fields with nested fields that use double underscores in their keys. For example, if you set `primary: true` on both `id` and `user__id`, the `primary` setting on the `user__id` field will be ignored; only `id` will be used for deduplication. However, if all the `primary` fields are all nested, such as `user__id` + `user__name`, it will work as expected.
### Node X No Longer Supported
If you're seeing errors like the following:
```
InvalidParameterValueException An error occurred (InvalidParameterValueException) when calling the CreateFunction operation: The runtime parameter of nodejs6.10 is no longer supported for creating or updating AWS Lambda functions. We recommend you use the new runtime (nodejsX.Y) while creating or updating functions.
```
... then you need to update your `zapier-platform-core` dependency to a non-deprecated version that uses a newer version of Node.js. Complete the following instructions as soon as possible:
1. Edit `package.json` to depend on a later major version of `zapier-platform-core`. There's a list of all breaking changes (marked with a :exclamation:) in the corresponding changelog in [Platform News](/integrations/news).
2. Increment the `version` property in `package.json`
3. Ensure you're using version `v18` (or greater) of node locally (`node -v`). Use [nvm](https://github.com/nvm-sh/nvm) to use a different one if need be.
4. Run `rm -rf node_modules && npm i` to get a fresh copy of everything
5. Run `zapier-platform test` (or deprecated `zapier test`) to ensure your tests still pass
6. Run `zapier-platform push` (or deprecated `zapier push`)
7. Run `zapier-platform promote YOUR_NEW_VERSION` (or deprecated `zapier promote YOUR_NEW_VERSION`) (from step 2)
8. Migrate your users from the previous version (`zapier migrate OLD_VERSION YOUR_NEW_VERSION`)
### What Analytics are Collected?
Starting with v8.4.0, Zapier collects information about each invocation of the CLI tool.
This data is collected purely to improve the CLI experience and will **never** be used for advertising or any non-product purpose. There are 3 collection modes that are set on a per-computer basis.
**Anonymous**
When you run a command with analytics in `anonymous` mode, the following data is sent to Zapier:
* which command you ran
* if that command is a known command
* how many arguments you supplied (but not the contents of the arguments)
* which flags you used (but not their contents)
* the version of CLI that you're using
* the integration app the CLI commands are run in
**Enabled** (the default)
When analytics are fully `enabled`, the above is sent, plus:
* your operating system (the result of calling [`process.platform`](https://nodejs.org/api/process.html#process_process_platform))
* your Zapier user id
**Disabled**
Lastly, analytics can be `disabled` entirely, either by running `zapier analytics --mode disabled` or setting the `DISABLE_ZAPIER_ANALYTICS` environment variable to `1`.
We take great care not to collect any information about your filesystem or anything otherwise secret. You can see exactly what's being collecting at runtime by prefixing any command with `DEBUG=zapier:analytics`.
### What's the Difference Between an "App" and an "Integration"?
We're in the process of doing some renaming across our Zapier marketing terms. Eventually we'll use "integration" everywhere. Until then, know that these terms are interchangeable and describe the code that you write that connects your API to Zapier.
### What does performGet do?
The `performGet` method is an optional feature in Zapier that allows you to retrieve detailed information about an object. For instance, if your `create` action's `perform` method only returns the new object's `ID`, you can use `performGet` to fetch the object's full properties using that `ID`.
`performGet` is only available for `Create` or `Search` actions and is most useful when the initial `perform` result is limited, and additional information is needed.
The results from `perform` are automatically passed to `performGet` via `bundle.inputData` each time the `create` or `search` runs, allowing you to retrieve more comprehensive details.
It's important to note that `performGet` is only invoked when the result returned by `perform` is not empty.
# Hydration
Source: https://docs.zapier.com/integrations/build-cli/hydration
The best answer to this lives in our [CLI docs](https://docs.zapier.com/integrations/reference/cli-docs#dehydration):
## What is dehydration & hydration?
Dehydration, and its counterpart hydration, is a tool that can lazily load
data that might be otherwise expensive to retrieve aggressively.
From a developer's perspective, you only need to worry about dehydration—Zapier will cover the hydration side of things.
## When to use dehydration?
The two most common times you should use dehydration in a Zapier integration are when:
1. You need to retrieve extra information from an API (e.g. a resource's list endpoint only returns IDs, but content must be retrieved per ID)
2. You need to provide access to a file (or files)
## Why use dehydration?
The core reason is reducing load to your API in case #1 above, where Zapier could fetch a list of known IDs of resources every 1-15 minutes per Zap, instead of the full definition of each of those resources. Putting any secondary requests behind a dehydration pointer means the request is made only once, although a Zap might see the same records again and again based on its polling cycle.
Dehydration saves even more bandwidth with files. No polling trigger should return files without dehydration, because otherwise, your app will send that file to Zapier around 100-300 times per day. For file outputs, implementing dehydration means the file will only be accessed and downloaded when a later Zap step asks for it.
The second reason is time. Your integration gets [30 seconds to run its API calls and any additional code](/integrations/build/troubleshoot-trigger-timeouts#trigger-runs-in-a-zap) each time a Zap step runs before the step would time out. If you are running into that time limit, consider if work could be offloaded to dehydration and hydration.
## How to use dehydration?
Check out our [example "files" app](https://github.com/zapier/zapier-platform/tree/main/example-apps/files) for an example of file dehydration in action with a working Zapier demo integration. You can even initialize a Zapier app based on that repo by entering `zapier-platform init . --template=files` (or deprecated `zapier init . --template=files`) in Terminal to see it in your local code editor.
## Hydration in action
Some key areas include `index.js`, `hydrators.js`, `triggers/newFile.js`, and `creates/uploadFile.js`.
When building your integration, you'll likely be retrieving file info from a remote server. Instead, this example integration hard codes file urls to demonstrate.
The `New File` Trigger returns those file urls. The method [`z.dehydrateFile`](https://github.com/zapier/zapier-platform/blob/master/packages/cli/README.md#zdehydratefilefunc-inputdata) is used to create a pointer to the `downloadFile` function. In order to pass those files to other apps in actions, we reference `hydrators.downloadFile`, our hydrating function given a file url.
If you look at the `hydrators.js` file, you can see the `downloadFile` function. `downloadFile` calls the method[`z.stashFile`](https://github.com/zapier/zapier-platform/blob/master/packages/cli/README.md#zstashfilebufferstringstream-knownlength-filename-contenttype) to return a URL file pointer.
All of these will work together to lazily fetch the trigger data only when needed, avoiding API calls during polling or for reuse.
The only Action for this app is to upload the file, given a `bundle.inputData.file`.
### Setup
First, install the sample Zapier app `zapier-platform init . --template=files` (or deprecated `zapier init . --template=files`) and `zapier-platform push` (or deprecated `zapier push`) it to Zapier. If you've not worked with the CLI before, start by checking out the [tutorial](/integrations/quickstart/cli-tutorial).
Here's how the integration looks in [Zapier's developer dashboard](https://developer.zapier.com/). Add an optional icon to it if you like.
Next, we'll want to add a Zap. Open the [Zap editor](https://zapier.com/editor), and select your integration's trigger.
Select continue - you'll notice this app has no authentication, as the file urls are accessible without it. Select `Test trigger` to see the three sample urls pulled in and hydrated pointer for each.
Now let's add the `Upload File` action to the Zap. Normally, we wouldn't want a setup like this (trigger off of new file / create a new file), because it would result in a [Zap loop](https://help.zapier.com/hc/en-us/articles/8496232045453-Zap-is-stuck-in-a-loop). But this is just a test—and be sure to turn the Zap off shortly after it's turned on.
Above, you'll see the string that prompts Zapier to hydrate a file. When the Zap runner encounters a string like this, Zapier will call the defined hydration function with the proper arguments.
After selecting `Test step`, you will see three new requests show in the `Monitoring` [tab of your integration](/integrations/build/test-monitoring):
The POST at the top was from the upload itself. The GET requests retrieve the file from the pointer provided by the trigger.
Now the Zap is ready to be turned on!
In this example app integration, the trigger will not run automatically due to the hard coded file urls used for illustrative purposes. Once you replace the `fileURLs` in the trigger `perform`, with a request to your API that returns the triggering file, you'll be able to test this out fully.
***
*Need help? [Tell us about your problem](https://developer.zapier.com/contact) and we'll connect you with the right resource or contact support.*
# Unauthorized Access to Zapier NPM Packages
Source: https://docs.zapier.com/integrations/build-cli/inc-547
**Note: No action is needed from Zapier users**, only from Zapier developers using one of the npm package versions listed below.
All Zapier products are operating as expected and there is no indication of data loss or leak.
## Timeline
* At 5:50AM UTC on 11/24/2025, Zapier became aware that a subset of our npm packages had unauthorized modifications made to them in an apparent supply chain compromise.
* The unauthorized core platform packages were unpublished by 10:30AM UTC.
* The rest were deprecated by 2:03PM UTC.
Please [see this link](https://status.zapier.com/incidents/01KAV9DDHMYT7R6MFHSB8C09E3#updates) for the most up-to-date information.
The list of Zapier npm packages impacted and versions is below along with instructions on how to mitigate impact if you are a Zapier developer.
For Zapier developers, the npm packages listed below were compromised and should not be downloaded or used. They have been unpublished and deprecated from npm and are no longer available. You can find updates here on the Zapier Status Page.
The compromised packages below are used for developing Zapier platform integrations and other Zapier connectors. Please do not install and do not push integration changes using these versions.
## Platform UI developers
If your integration is built on the Platform UI rather than the CLI, check the Versions page of your integration. The Platform Version column will show which package version your integration uses - as long as this is **not** one of versions 18.0.2, 18.0.3, or 18.0.4, your integration is not affected.
This is a quick and easy way to confirm you are not affected. Please also note that we have not seen any integrations using the affected versions despite continued monitoring, and the affected npm package versions have been deprecated and unpublished so that they cannot be used.
## Platform CLI developers
### Recommendation for developers
* What to do if you have downloaded any impacted packages?
* Re-install the latest version of the package with `npm i @latest` (the latest version not impacted will be grabbed).
* For instance, `npm i zapier-platform-core@latest`
* Include “-g” for global installation
* For instance, `npm i -g zapier-platform-cli@latest`
* How to get the latest “good” package?
* Run `npm i @latest`
* For instance, `npm i zapier-platform-core@latest`
* Make sure no impacted versions are cached:
* Run `npm cache clean --force`
* Remove any local `node_modules` files
* Run `rm -rf node_modules`
* Remove package-lock.json to ensure fresh package version resolution
* Run `rm -f package-lock.json`
### Recommendation for partners who maintain integrations
For integration developers, do not push new versions with these packages installed in the timeframe above \[5:50AM UTC to 2:03PM UTC].
If you already pushed a new version with these packages installed, please rotate secrets and private keys with updated values using `zapier env` or through [developer.zapier.com](https://developer.zapier.com).
### Additional questions
If you have any additional questions, you can reach out to Developer Support here: [https://developer.zapier.com/contact](https://developer.zapier.com/contact).
### List of affected packages
* [zapier-platform-cli](https://www.npmjs.com/package/zapier-platform-cli) 18.0.2
* [zapier-platform-cli](https://www.npmjs.com/package/zapier-platform-cli) 18.0.3
* [zapier-platform-cli](https://www.npmjs.com/package/zapier-platform-cli) 18.0.4
* [zapier-platform-core](https://www.npmjs.com/package/zapier-platform-core) 18.0.2
* [zapier-platform-core](https://www.npmjs.com/package/zapier-platform-core) 18.0.3
* [zapier-platform-core](https://www.npmjs.com/package/zapier-platform-core) 18.0.4
* [zapier-platform-legacy-scripting-runner](https://www.npmjs.com/package/zapier-platform-legacy-scripting-runner) 4.0.2
* [zapier-platform-legacy-scripting-runner](https://www.npmjs.com/package/zapier-platform-legacy-scripting-runner) 4.0.3
* [zapier-platform-legacy-scripting-runner](https://www.npmjs.com/package/zapier-platform-legacy-scripting-runner) 4.0.4
* [zapier-platform-schema](https://www.npmjs.com/package/zapier-platform-schema) 18.0.2
* [zapier-platform-schema](https://www.npmjs.com/package/zapier-platform-schema) 18.0.3
* [zapier-platform-schema](https://www.npmjs.com/package/zapier-platform-schema) 18.0.4
* [@zapier/ai-actions](https://www.npmjs.com/package/@zapier/ai-actions) 0.1.18
* [@zapier/ai-actions](https://www.npmjs.com/package/@zapier/ai-actions) 0.1.19
* [@zapier/ai-actions](https://www.npmjs.com/package/@zapier/ai-actions) 0.1.20
* [@zapier/ai-actions-react](https://www.npmjs.com/package/@zapier/ai-actions-react) 0.1.12
* [@zapier/ai-actions-react](https://www.npmjs.com/package/@zapier/ai-actions-react) 0.1.13
* [@zapier/ai-actions-react](https://www.npmjs.com/package/@zapier/ai-actions-react) 0.1.14
* [@zapier/babel-preset-zapier](https://www.npmjs.com/package/@zapier/babel-preset-zapier) 6.4.1
* [@zapier/babel-preset-zapier](https://www.npmjs.com/package/@zapier/babel-preset-zapier) 6.4.2
* [@zapier/babel-preset-zapier](https://www.npmjs.com/package/@zapier/babel-preset-zapier) 6.4.3
* [@zapier/browserslist-config-zapier](https://www.npmjs.com/package/@zapier/browserslist-config-zapier) 1.0.3
* [@zapier/browserslist-config-zapier](https://www.npmjs.com/package/@zapier/browserslist-config-zapier) 1.0.4
* [@zapier/browserslist-config-zapier](https://www.npmjs.com/package/@zapier/browserslist-config-zapier) 1.0.5
* [@zapier/eslint-plugin-zapier](https://www.npmjs.com/package/@zapier/eslint-plugin-zapier) 11.0.3
* [@zapier/eslint-plugin-zapier](https://www.npmjs.com/package/@zapier/eslint-plugin-zapier) 11.0.4
* [@zapier/eslint-plugin-zapier](https://www.npmjs.com/package/@zapier/eslint-plugin-zapier) 11.0.5
* [@zapier/mcp-integration](https://www.npmjs.com/package/@zapier/mcp-integration) 3.0.1
* [@zapier/mcp-integration](https://www.npmjs.com/package/@zapier/mcp-integration) 3.0.2
* [@zapier/mcp-integration](https://www.npmjs.com/package/@zapier/mcp-integration) 3.0.3
* [@zapier/secret-scrubber](https://www.npmjs.com/package/@zapier/secret-scrubber) 1.1.3
* [@zapier/secret-scrubber](https://www.npmjs.com/package/@zapier/secret-scrubber) 1.1.4
* [@zapier/secret-scrubber](https://www.npmjs.com/package/@zapier/secret-scrubber) 1.1.5
* [@zapier/spectral-api-ruleset](https://www.npmjs.com/package/@zapier/spectral-api-ruleset) 1.9.1
* [@zapier/spectral-api-ruleset](https://www.npmjs.com/package/@zapier/spectral-api-ruleset) 1.9.2
* [@zapier/spectral-api-ruleset](https://www.npmjs.com/package/@zapier/spectral-api-ruleset) 1.9.3
* [@zapier/stubtree](https://www.npmjs.com/package/@zapier/stubtree) 0.1.2
* [@zapier/stubtree](https://www.npmjs.com/package/@zapier/stubtree) 0.1.3
* [@zapier/stubtree](https://www.npmjs.com/package/@zapier/stubtree) 0.1.4
* [@zapier/zapier-sdk](https://www.npmjs.com/package/@zapier/stubtree) 0.15.5
* [@zapier/zapier-sdk](https://www.npmjs.com/package/@zapier/stubtree) 0.15.6
* [@zapier/zapier-sdk](https://www.npmjs.com/package/@zapier/stubtree) 0.15.7
* [redux-router-kit](https://www.npmjs.com/package/redux-router-kit) 1.2.2
* [redux-router-kit](https://www.npmjs.com/package/redux-router-kit) 1.2.3
* [redux-router-kit](https://www.npmjs.com/package/redux-router-kit) 1.2.4
* [zapier-async-storage](https://www.npmjs.com/package/zapier-async-storage) 1.0.1
* [zapier-async-storage](https://www.npmjs.com/package/zapier-async-storage) 1.0.2
* [zapier-async-storage](https://www.npmjs.com/package/zapier-async-storage) 1.0.3
* [zapier-scripts](https://www.npmjs.com/package/zapier-scripts) 7.8.3
* [zapier-scripts](https://www.npmjs.com/package/zapier-scripts) 7.8.4
# Input Field Configuration
Source: https://docs.zapier.com/integrations/build-cli/input-fields
On each trigger, search, or create in the `operation` directive, you can provide fields as an array of objects under `inputFields`.
Those fields have various options you can provide. Here is a brief example:
```js theme={null}
const App = {
// ...
creates: {
create_recipe: {
// ...
operation: {
// an array of objects is the simplest way
inputFields: [
{
key: "title",
required: true,
label: "Title of Recipe",
helpText: "Name your recipe!",
},
{
key: "style",
required: true,
choices: { mexican: "Mexican", italian: "Italian" },
},
],
perform: () => {},
},
},
},
};
```
Notably, fields come in different types, which may look and act differently in the Zap editor. The default field display is a single-line input field.
| Type | Behavior |
| ---------- | ----------------------------------------------------------------------------------------------------------------------------------------------------------------------------------------------------------------------------- |
| `string` | Accepts text input. |
| `text` | Displays large, `