Save new Gmail attachments to Google Drive
Collect new Typeform responses as rows on Google Sheets
Share your new Instagram posts to your Facebook page
Create new Trello cards from new Google Calendar events
Get Slack notifications for new Typeform entries
- Zapier’s app directory
- Zapier’s onboarding experience
- In many of Zapier’s integration partners’ apps and sites
Expected time to create a Zap template: 10 minutes.
How to build a Zap template
Creating Zap templates is straightforward and follows the same steps as building any other Zap. Start by selecting the app and trigger to initiate the Zap. Next, choose an action app and map the fields from the trigger app to the action. You can also add optional steps to customize your Zap further. Finally, give your Zap a clear title and description to help others quickly understand its purpose and when to use it. To get started, go to Zapier’s Zap template creator or from the Zap template dashboard, click Create Zap template.1. Add a Trigger Step

Note: Only Zapier integrations that have been launched publicly can be used in Zap templates. Integrations in private status cannot be used in a Zap template. You should also avoid selecting non-promoted versions of public integrations, that is, versions with version numbers or app tags like “Legacy” or “Deprecated”, as that would prevent the Zap template from being published.
Choose the app’s trigger from the dropdown that starts your Zap.

Test pane. If certain fields aren’t available, it’s because the integration developer didn’t include them in the integration’s sample data. While you can still use the method in the Zap template, you might not be able to pre-map fields for users in subsequent action step(s).
If there are input fields to customize the trigger, you may assign a default value or leave the input fields empty. Users will be able to input their own information when setting up the Zap. Once done, click Continue to proceed to the next step.

2. Add an Action Step
Select the action app by selecting it from the “Top Apps” list or searching for the app by name.
Note: Only Zapier integrations that have been launched publicly can be used in Zap templates. Integrations in private status cannot be used in a Zap template. You should also avoid selecting non-promoted versions of public integrations, that is, versions with version numbers or app tags like “Legacy” or “Deprecated”, as that would prevent the Zap template from being published.
Choose the app’s action from the dropdown that you want to follow the trigger. Same as the trigger, the Zap template editor will load the sample data available for the selected action.

Note: If you add a search action following the trigger, you will need to add another action step following the search. This is because Zap workflows cannot end with a search method (unless it’s a dyanmic find or create action).
Now for the most crucial part of your Zap template: Where appropriate, map the output fields from the trigger to the input fields in the action. The action step will show input fields that are statically available. Dynamic input fields that populate based on the input of another field will not be available. For the best Zap template experience, add field mapping to as many input fields as possible to help users set up workflows quickly. For example, you might map Gmail’s Attachment field to File field for Google Drive, as well as Attachments Filename to the File Name field.

Note: Custom fields from apps (i.e. fields added by users) will not be available. This is because the Zap template editor is not authenticated with an app account to fetch that data. When users create a Zap from your template, they’ll be able to leverage dynamic and custom fields.
Tip: Use Zapier’s date and time syntax to modify dates and times in action form fields.Most dropdown menus are used to select folders, projects, and other user-generated data, and should be left blank by default. You can, however, select options for dropdowns for boolean yes/no fields if you’re certain which option is best for all users of this Zap template. Zap template action forms include
required (denoted with a red asterix) and optional fields. When users set up your Zap template, they are required to complete required fields before turning on the Zap. If you know the best data to map to those fields, add them to make sure your users’ Zap workflows include as much detail as possible.

Note: Do not enter a value into an input field unless every user of the Zap template would want that value included in the action.Zapier then shows a
Test pane, similar to what users see when setting up Zap workflows. You won’t be able to test your action steps when building a Zap template. The Test pane will call this out, and default to showing a successful test.

3. (Optional) Add filters or additional action steps
You can choose to add another step to your Zap, or finish and save this Zap template with only two steps (trigger and 1 action step). Most Zap templates only need two steps, with a trigger to watch for new or updated data from one app, and an action to do something with that data in another app. Sometimes, though, you need more steps for advanced workflows, including:- Additional create actions to add additional automations to your workflow
- Filters to watch for specific items from trigger or action step(s)
- Search actions to find specific data from apps, recommended especially to find customers, tickets, projects, and more before creating new items with Zap workflows
+ button where you want to insert the additional step. Then repeat step 2 and set up the additional action.
For example, you could add a filter between the trigger and action step to have the action step only run when specific criteria is met. Learn more about filters. You can define a filter in the Zap template, or leave it blank and let users customize the filter to their needs.
Note: Most Zap templates don’t need filters, and most filters should be added by users later if required. However, including a filter in a Zap template can be useful if your Zap template is only useful with a filter to remove extraneous data.

Note: Paths by Zapier, Code by Zapier, Webhooks by Zapier, Looping by Zapier, and Formatter by Zapier action steps are currently not allowed in Zap templates.
4. Add a title, description, and test your Zap template
Once you’ve finsihed building your Zap template, you can give it a title and description. ClickSubmit in the top-right corner or at the bottom of the Test in the last step of your Zap template.

Submit, you will be prompted to provide a title and description for the Zap template.

How to write a Zap template title
The title clearly and briefly states the apps the Zap connects and the workflow it accomplishes. They include the trigger and action apps and the actions they perform. They use present tense, active voice, and sentence case.
Add new Gmail emails to Google Sheets as rows. The title mentions what happens in the trigger app followed by what Zapier does in the action app. Some examples of good titles:
-
Create Trello cards for new Wufoo form entries -
Get Slack notifications for new Google Drive files in a folder -
Subscribe new Gumroad customers to a MailChimp list -
Save new liked SoundCloud tracks to Google Drive
Tip: Use your discretion whether to mention the action or trigger app first. The trigger app works best first in most cases, but sometimes it sounds awkward — if so, go with the action app first.Follow these rules in your Zap template titles:
-
Start with an appropriate verb. Zap templates start with an action verb that describes what the Zap does in the action app, such as
Create,Add,Make,Insert,Update,Subscribe, orGet. Use unique verbs when possible, and use the most appropriate verb for the action Zapier performs with the app. -
Use sentence case. Capitalize the first letter in the title and app names when appropriate.
-
Right:
Create Trello cards for new Wufoo form entries -
Wrong:
Create Trello Cards For New Wufoo Form Entries
-
Right:
-
Use present tense and active voice. Zap workflows automatically run whenever the trigger conditions are met. The title should reflect that with active present tense.
-
Right:
Get Slack notifications for new Google Drive files -
Wrong:
Slack will notify you when a new Google Drive file is saved
-
Right:
- Always specify if the trigger involves new or updated items. Zap workflows typically run when a new item is created, or an existing item is updated. Be sure to include new or updated in the title before mentioning the action app name to clarify what the Zap will automate..
-
Make app items plural. Zap workflows run on every new or updated item in your trigger app. Always make the trigger and action items plural to emphasize that, such as
Google Sheets rowsorMailchimp subscribers. - Respect app name styles. Make sure to use the same capitalization and spelling that the apps in your Zap use in their branding; double-check the app’s site or Zapier’s integration list.
-
Never use
syncorautomaticin titles. All Zap workflows run automatically, and can’t sync data bidirectionally. Avoid these terms in titles; sync is misleading, and automatic is redundant. -
Don’t use personal pronouns. Never use
you,we, orIin Zap template titles unless the trigger or action items specifically include those words.
How to write a Zap template description
Zap template descriptions share more detail about what the Zap does and scenarios in which to use it in two to four sentences. They tell readers what this Zap does for them and how it works. Start your description with the user’s problem or need. Then explain how Zapier meets that need, when the Zap will run, and what the Zap does when it runs. Explain the trigger and action items in plain language that show the workflow’s value. Some good examples:Find yourself spending too much time adding event attendees to your CRM by hand? Now with the help of Zapier, the tedious work is done for you. This integration will add every new Eventbrite attendee to Zoho CRM as a new contact, saving you time for more important work.
After someone fills out a form on your site, you’ll want to hear about it or send them a follow-up email. This Zapier automation handles both gracefully, sending an email via Gmail to you or the form respondent whenever you get a new Typeform entry. You’ll never have to send the same message over and over again.
Expedient order processing makes for happy customers. Make sure you act on every new delivery with this Zapier automation. It will capture every new order placed on your Shopify store after being set up, creating a delivery task for it on Onfleet so your team can fulfill it without delay.Keep these guidelines in mind:
- Use present tense and active voice as in the Zap title.
- 1 paragraph, 2-4 sentences is enough for most Zap template descriptions.
-
Don’t use Zapier-specific terminology including Zap, Zap template, trigger, action, or terms that Zapier doesn’t support, such as sync. Instead, use generic words, such as
integrationorautomation, that are universally understood. - Use same terms as the integrations themselves. If an app calls the results of a form an “entry” don’t call it a “submission,” or if an email app uses “tags,” don’t refer to “folders.”
- Don’t include links. Do not include links of any kind, whether Zapier-owned or third-party owned.
-
Include tips at the end. If your Zap template requires extra setup for filters or other steps, or if it doesn’t cover all use cases users may expect, include a sentence at the end to clarify. Start the tip with
Note:, and format the entire note in italics with Markdown formatting. For example:*Note: Add the tag you want to the Zap's Filter step.*
Note: Always write unique descriptions for each Zap template — Zap templates that use the same descriptions but only replace app names, or those that duplicate the Zap template title, will be rejected.
Once you’ve added your Zap template title and description, click
Save Draft.
Now try using the Zap template to make sure it works as expected. Open your Zap template dashboard, click the ... icon beside the Zap template you built, and select Create Zap. A new window will open, creating a Zap from the Zap template. Click through each step of the Zap, validate everything works as expcted, and that you can turn the Zap on.

5. Submit Zap template for review
When your Zap template is ready for public release, clickSubmit for Review in the same modal where you added the title and description. This will submit the Zap template to our team to review to ensure it works as expected and meets our standards.
After your Zap template(s) have been reviewed, we’ll send you an automated email with the subject We’ve reviewed your Zap templates!. Reviews are typically completed within 2 weeks. If your Zap template(s) are approved, we will publish them to have them appear on your app’s directory page and in our embed solutions.
If your Zap template is rejected, the automated email will provide a reason and how the Zap template needs to be updated before re-submitting for review.
You can create and submit as many Zap templates as you like! The more you create, the easier it will be for users to discover your integration and build Zap workflows using it.
Manual field mapping (custom pills)
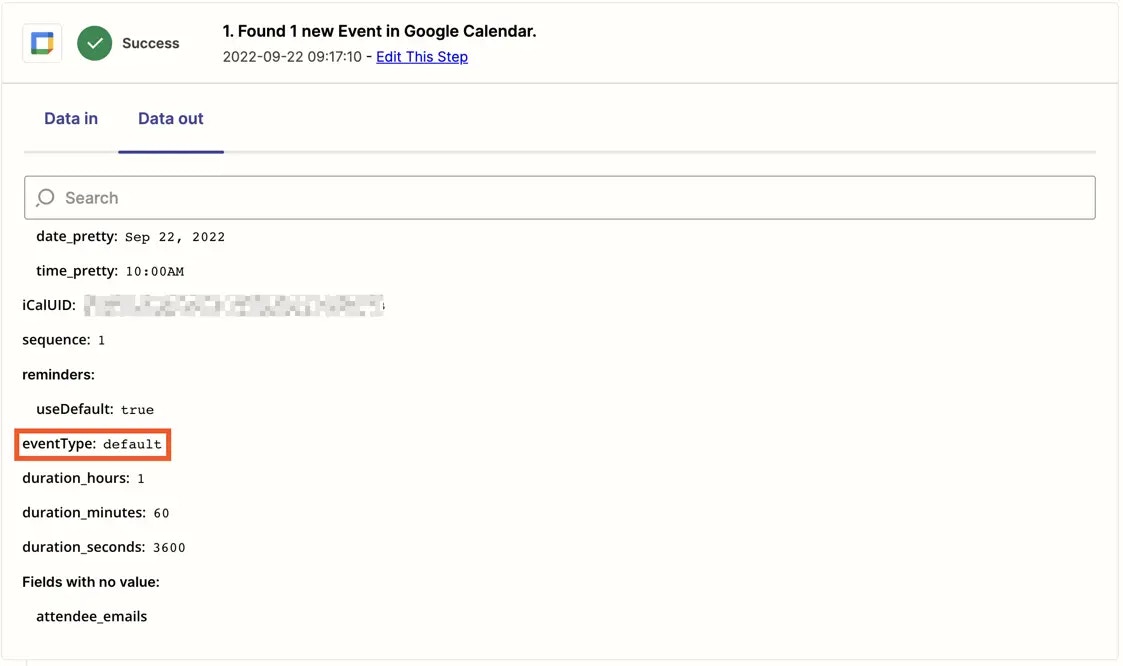
When creating a Zap template, you typically map data between steps by selecting from a list of fields (or “pills”) that have been added as sample data by the integration developer. Field mapping is what allows data to carry from one step to another. Custom pills take this a step further by letting you map fields that you know are returned by an integration, but haven’t been added as sample data. For example, if you wanted to map the fieldeventType between the trigger and step 2 of your Zap template, but eventType isn’t available in the trigger’s sample data, you could create a custom pill to pull this field dynamically. Here’s how to create custom pills.
Step 1: Identify the step position
- The trigger is in position 1, with subsequent steps numbered sequentially

- Because the sample data doesn’t include the field you want, we suggest setting up a live Zap replicating the Zap template you want to create
- After publishing your Zap, let the Zap run live and then review its Zap history
- From the Zap history, you can identify the exact name of the field you want to pull data from
-
In this example, we can see Google Calendar > New Event returns the field
eventType
- Once you have both the step position and field name, you can combine them to create a custom pill
-
Start with 2 open curly braces
{{ -
Add the step position folllowed by 2 underscores
__ - Next, add the field name
-
Finally, finish with 2 closed curly braces
}}
eventType field isn’t returned in the sample data for Google Calendar > New Event. If you want to map that field in a Zap template, you can do so using the custom pill {{1__eventType}}.
Step 4: Insert custom pill
- You can insert the custom pill into any field in any step that comes after the field that returns the data
- Custom pills work in both Zap templates and regular workflows. Learn more about creating custom pills in Zap workflows.
- Custom pills will only work when a live Zap run returns the field used in the custom pill. If the field isn’t returned during a live Zap run, fields where the custom pill has been mapped will remain empty
- The methodology described above only works for top-level fields. If a field is nested under another field (or multiple fields), each nest would be separated by double underscores.
-
For example, if the trigger returned the following and you wanted to retrieve the response for question 3, your custom pill would look like this:
{{1__questions__3}}

Promote your Zap templates
It’s not enough to turn your ideal workflows into Zap templates. You need to get them in front of your end-users. Zapier automatically promotes your Zap templates in our SEO, app directory, and on partner sites using our embed tools (where both your and their apps are used in the template). You can promote Zap templates further by embedding them into your site (user dashboards, blog posts, help articles) using our Zap template element.Zapier app directory
Your published Zap templates will appear on your directory page. Zap templates are loosely ordered by popularity, helping users easily discover common use-cases. Users can also search for Zap templates that connect your app with another.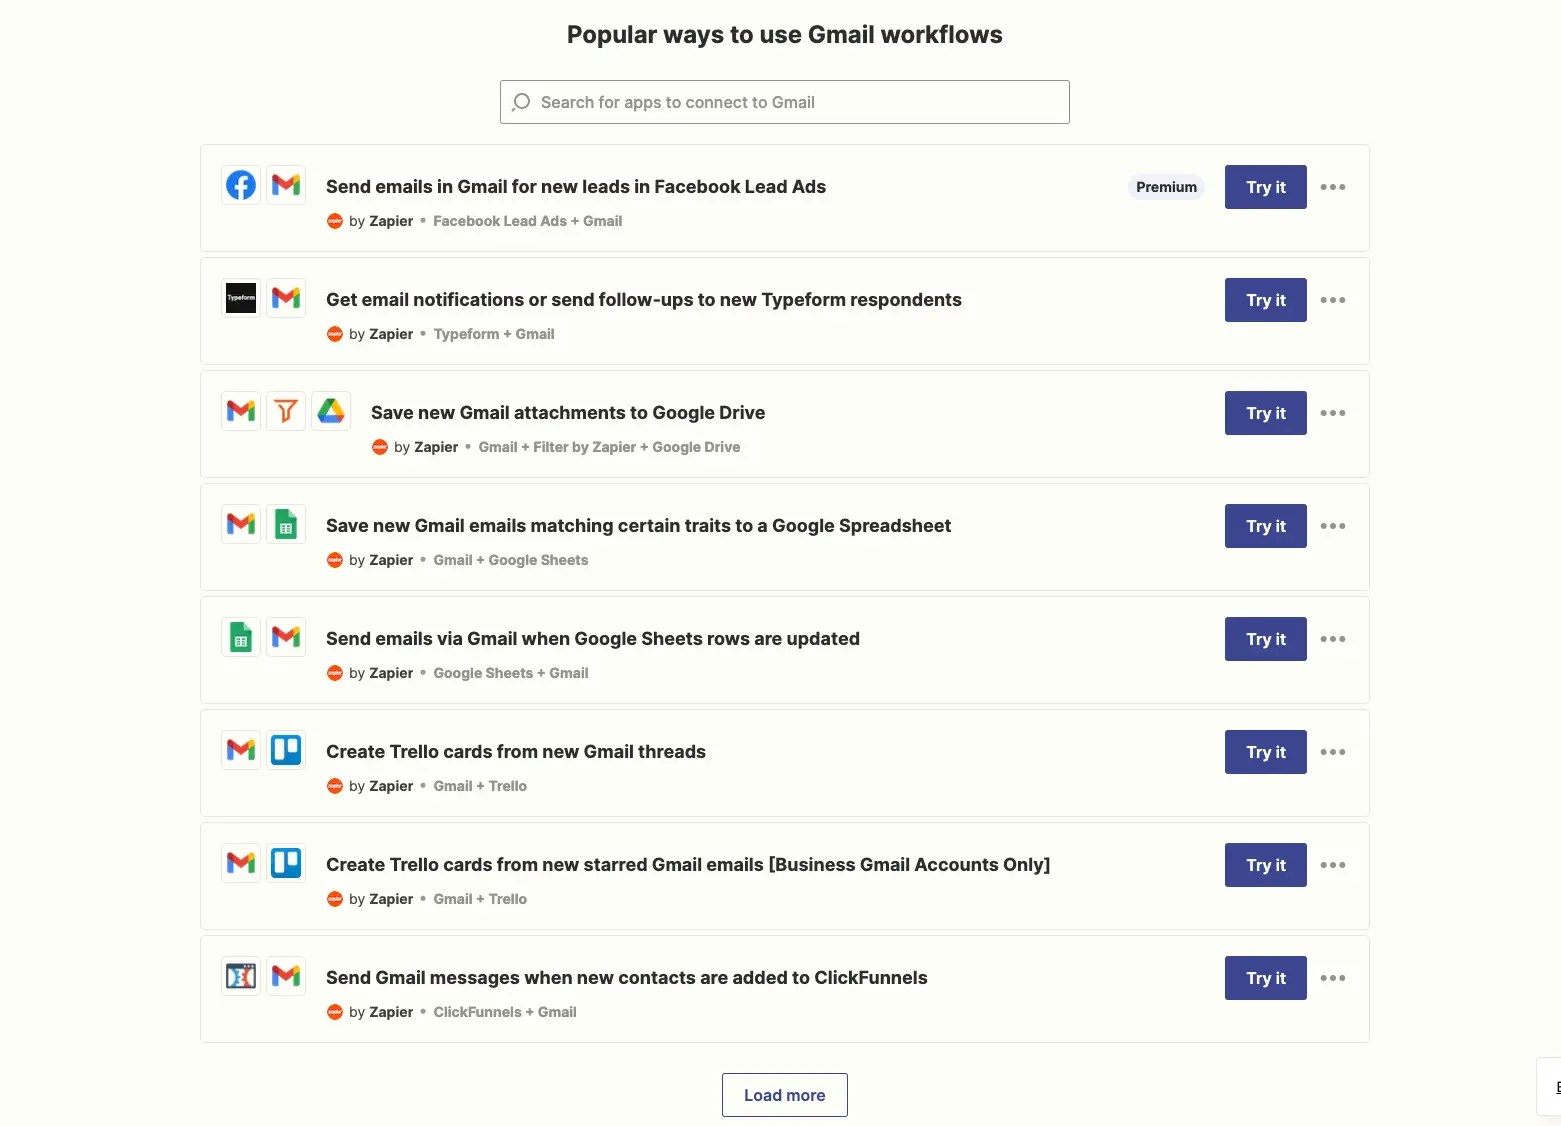
Manage your Zap templates
Over time, you’ll likely make dozens of Zap templates. You can manage them — in draft, review, or publicly available — from your Zap templates dashboard alongside Zapier Developer Platform tools.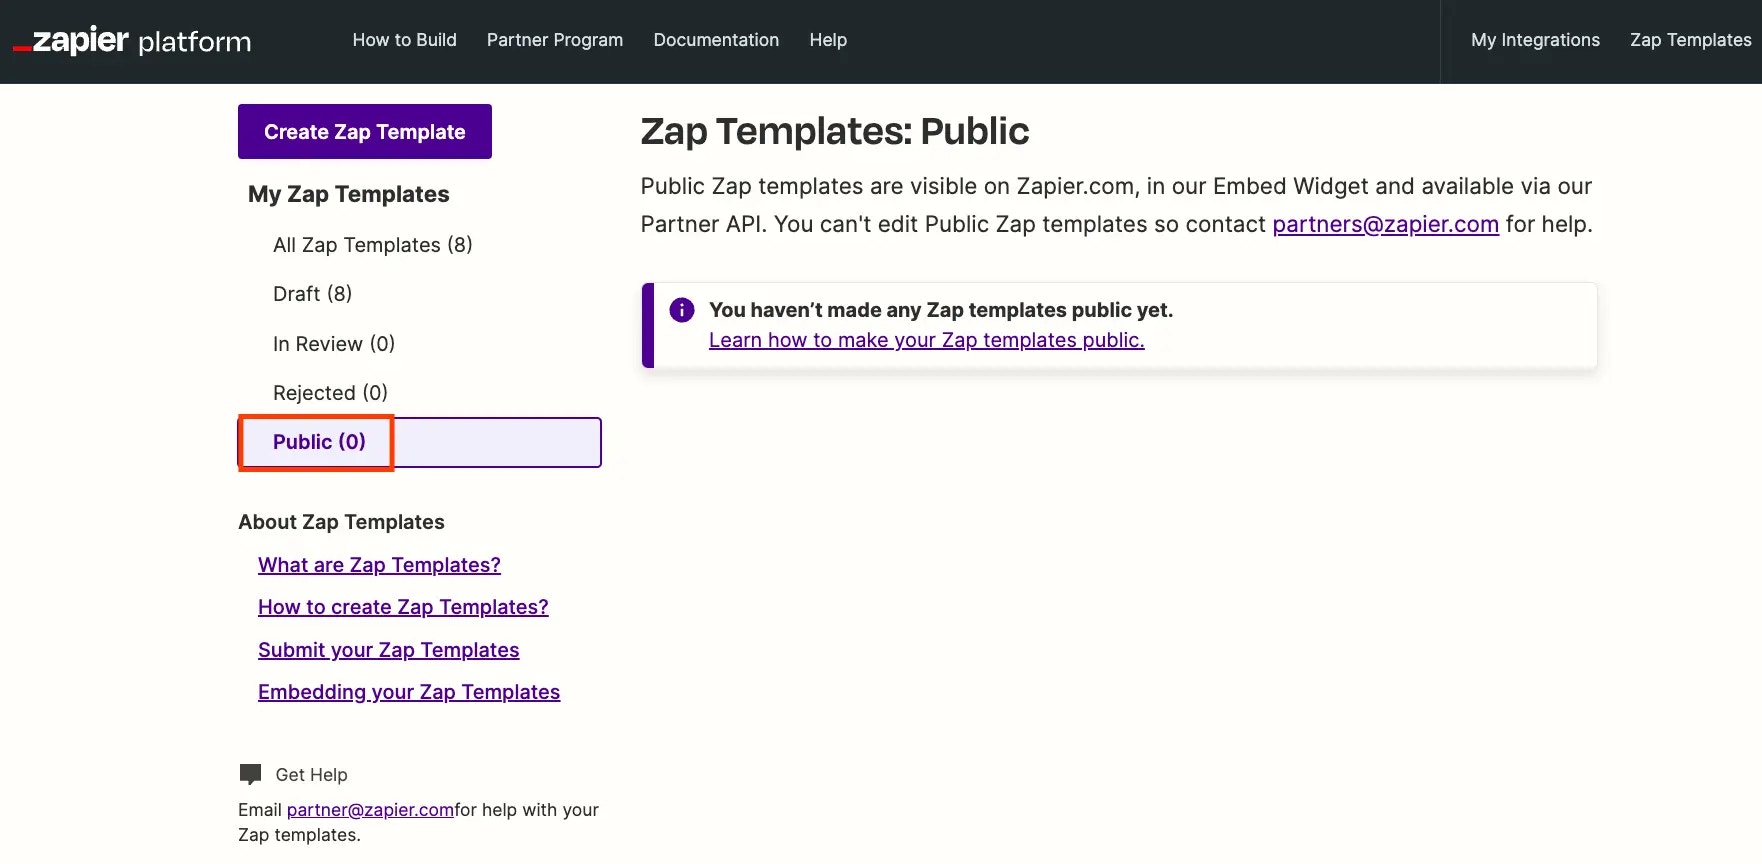
Promoting new versions of your integration
When promoting a new version of your integration, all Zap templates using the integration and having no breaking changes with the existing version will be updated to use the promoted version. The following are considered breaking changes:- A trigger/action is hidden or deleted
- A trigger/action key is changed
- A trigger/action input field key is changed or removed
- A trigger/action output field key is changed or removed
Deprecating versions of your integration
When deprecating a version of your integration, any Zap templates using the integration will automatically be marked as Invalid within 24 hours of the deprecation. While invalid, the Zap template will not be Public until it is adjusted to use a non-deprecated version, re-submitted for review and approved. This ensures users won’t use deprecated and broken Zap templates to make workflows. If you’re having trouble accessing Invalid templates, please submit a ticket.Frequently Asked Questions
Where can I find a Zap template's ID?
Where can I find a Zap template's ID?
... icon beside the Zap template.
Copy Template ID.


Why do I see Zap templates on my app's directory page that don't appear on my "Zap templates" page in the Developer Platform?
Why do I see Zap templates on my app's directory page that don't appear on my "Zap templates" page in the Developer Platform?
Who can publish Zap templates using my integration?
Who can publish Zap templates using my integration?
Can I opt out of Zapier-generated Zap templates for my integration?
Can I opt out of Zapier-generated Zap templates for my integration?
Can we remove or hide Zap templates that include our competitors from our directory page?
Can we remove or hide Zap templates that include our competitors from our directory page?
How can I make changes to a published Zap template?
How can I make changes to a published Zap template?
- Zap templates should work for the broadest audience. Try to avoid requesting changes that will exclude an audience segment from successfully using a Zap template
-
Every partner on Zapier has their own style and tone. We will not update titles or descriptions of Zap templates created by other partners to better accommodate your preferences. While a title and description might not match your tone and style, it could very well for the partner that published the Zap template
- If you believe you found an error with a title or description (eg the title references the wrong action), we will review and consider making the correction
- When requesting a functional change to a Zap template created by another partner, clearly state the Zap templates current behavior and the expected behavior to justify the requested change
How can I re-order Zap templates on my directory page?
How can I re-order Zap templates on my directory page?
How can I exclude specific Zap templates on my directory page?
How can I exclude specific Zap templates on my directory page?
How can I view all Zap templates created by my integration team?
How can I view all Zap templates created by my integration team?
How can I unpublish a Zap template?
How can I unpublish a Zap template?
Why were my Zap templates rejected?
Why were my Zap templates rejected?
- The title and/or description of the Zap template does not comply with our style guide’s uniqueness requirements
- Fields in the trigger step have not been correctly mapped to corresponding fields in the action step(s)
- The use case for the Zap template is considered too narrow or specific for general use
- A Zap template with a similar use case already exists
- The Zap template title and/or description was written in a language other than English
- The Zap template includes a code, custom webhook, or custom formatter step which is currently not allowed
- The Zap template contains hardcoded values such as phone numbers, emails, or IDs which should be dynamically mapped from the trigger or another action step
- Submitting a large number of Zap templates for an integration with a low active user count can lead to rejection. We aim to ensure that our review resources are allocated fairly across all partners. When a disproportionate amount of submissions comes from a single source, it negatively impacts the review process for others. To maintain a balanced and efficient review process, we enforce limits based on the size and usage of the app
Can I select which Zap templates to display in my embed?
Can I select which Zap templates to display in my embed?
How many users are using a particular Zap template
How many users are using a particular Zap template
How many Zap templates should my integration have?
How many Zap templates should my integration have?
Why did my Zap templates stop working?
Why did my Zap templates stop working?
Which use cases should my Zap templates highlight?
Which use cases should my Zap templates highlight?
Can I add filters/other conditions to my Zap templates?
Can I add filters/other conditions to my Zap templates?
Do users need to have an account to create their own Zap workflows?
Do users need to have an account to create their own Zap workflows?
Need help? Tell us about your problem and we’ll connect you with the right resource.